What Is Exposure Bracketing Mode on a Camera?

Cloudpano
January 24, 2026
5 min read
Share this post

What Is Exposure Bracketing Mode on a Camera? 📸✨

A Beginner-Friendly Guide to Using Exposure Bracketing Mode

If you’ve ever explored your camera menu and seen a setting called exposure bracketing mode, you might have wondered what it does — and whether you should use it.

The short answer? Yes, you absolutely should. 🙌

Exposure bracketing mode is one of the most powerful tools built into modern cameras. It helps photographers capture better detail, improve dynamic range, and create professional HDR images with less guesswork.

In this guide, you’ll learn what exposure bracketing mode is, how it works, when to use it, and how it can dramatically improve your photography — especially for real estate, interiors, and landscapes.

Let’s break it down. 🚀

What Is Exposure Bracketing Mode? 🤔

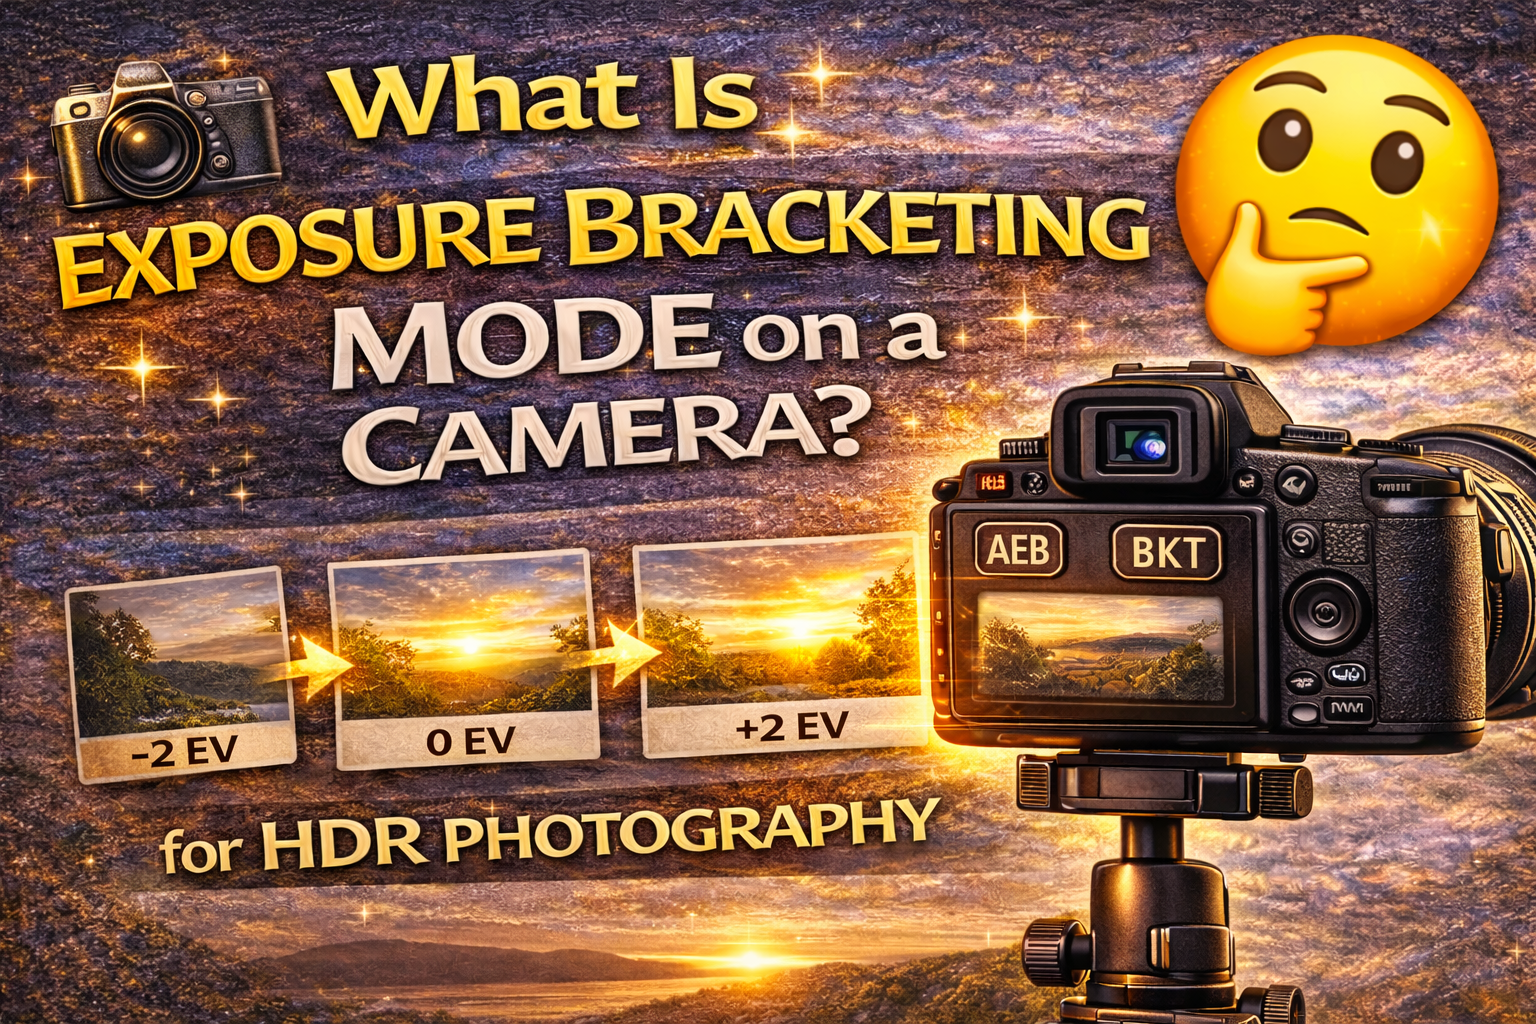
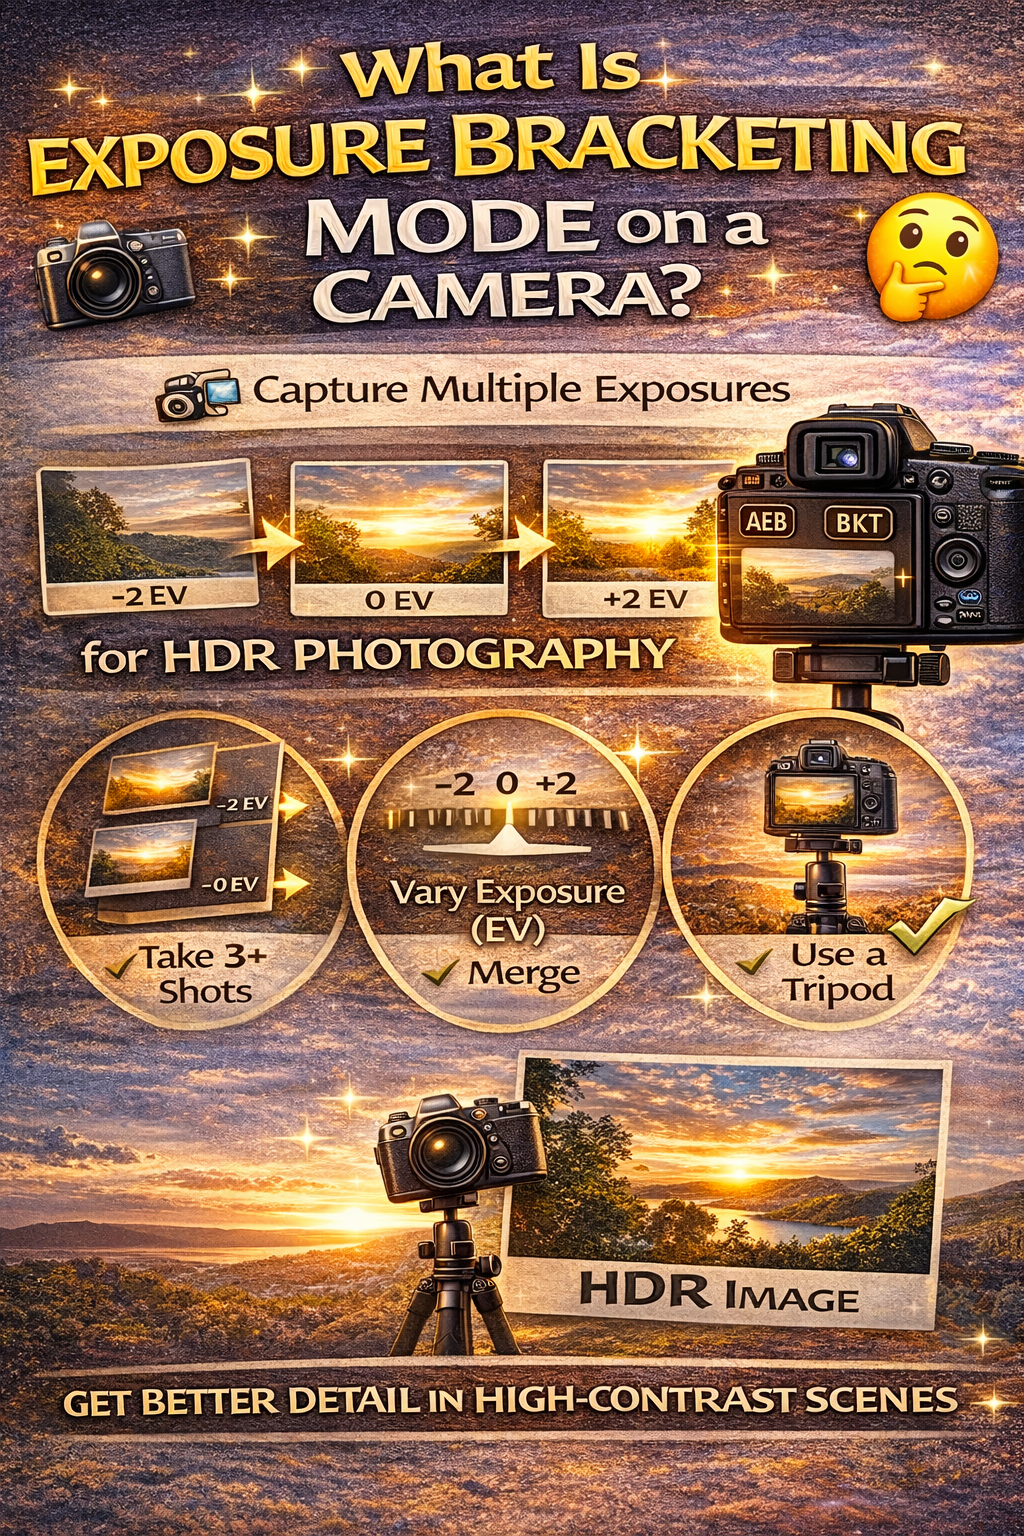
Exposure bracketing mode is a camera feature that automatically takes multiple photos of the same scene at different brightness levels.

Instead of guessing the perfect exposure, your camera captures a sequence like this:

📷 One darker photo (for highlights)
📷 One normal photo (for midtones)
📷 One brighter photo (for shadows)

These images can then be blended together into one balanced photo or used individually.

It’s like giving yourself exposure insurance.

Why Cameras Need Exposure Bracketing Mode 🧠

Your eyes can see a huge range of light — from bright windows to dark corners — all at once.

Cameras can’t.

A single exposure often leads to:

❌ Blown-out windows
❌ Dark, muddy shadows
❌ Loss of detail in bright or dark areas

Exposure bracketing mode solves this by capturing multiple exposures that cover the full range of light in the scene.

How Exposure Bracketing Mode Works ⚙️

When you enable exposure bracketing mode, your camera automatically adjusts exposure between shots.

Most commonly, it changes shutter speed while keeping ISO and aperture the same.

Example 3-shot bracket:

• Shot 1: Normal exposure
• Shot 2: Underexposed (darker)
• Shot 3: Overexposed (brighter)

This happens instantly when you press the shutter, making the process fast and consistent.

What Settings Change During Bracketing 🔄

In most cases:

✔ Aperture stays fixed (to maintain depth of field)
✔ ISO stays fixed (to keep noise levels consistent)
✔ Shutter speed changes (to vary brightness)

This keeps your photos aligned and easy to merge later.

That’s why exposure bracketing mode is ideal for HDR photography.

When Should You Use Exposure Bracketing Mode? 🏠🌄

Exposure bracketing mode is especially useful in high-contrast scenes, such as:

🏡 Real estate interiors with bright windows
🌅 Sunrises and sunsets
🏔 Landscapes with bright skies and dark ground
🏙 Cityscapes at night
🏛 Architectural photography

Anytime a scene has both very bright and very dark areas, bracketing helps.

How Many Photos Does Exposure Bracketing Mode Take? 🔢

Most cameras allow you to choose how many shots are in a bracket sequence.

Common options:

📸 3 shots (standard)
📸 5 shots (better for interiors)
📸 7+ shots (extreme lighting)

For most photography, 3–5 exposures are perfect.

What Does EV Mean in Exposure Bracketing? 📏

When setting up exposure bracketing mode, you’ll see “EV” values.

EV stands for Exposure Value. It controls how much brighter or darker each shot is.

Common settings:

±1 EV = Small exposure difference
±2 EV = Larger exposure difference

For HDR photography, ±2 EV spacing is often ideal.

Bracketing Mode vs Manual Exposure 🆚

Manual exposure gives you one brightness level. If it’s wrong, you have to reshoot.

Exposure bracketing mode gives you multiple exposures instantly — so you always have options.

It’s faster, safer, and more flexible.

Handheld vs Tripod Bracketing 🦵

While you can use exposure bracketing mode handheld, a tripod improves results by keeping frames aligned.

Tripods help:

✔ Reduce blur
✔ Keep images aligned
✔ Make HDR merging easier

For interiors and landscapes, a tripod is highly recommended.

How Exposure Bracketing Mode Helps HDR Photography 🌈

HDR photography combines bracketed exposures into one balanced image.

Without exposure bracketing mode, you’d have to adjust exposure manually between every shot — slow and inconsistent.

Bracketing mode automates the process and ensures consistent spacing between exposures.

Exposure Bracketing Mode vs Auto HDR 🤖

Some cameras have an Auto HDR mode that merges images in-camera.

The downside:

❌ Less control
❌ Lower-quality merges
❌ Limited editing flexibility

Using exposure bracketing mode and merging later in software gives much better results.

How to Turn On Exposure Bracketing Mode 🔧

Every camera brand is different, but the setting is often called:

AEB (Auto Exposure Bracketing)
BKT (Bracketing)
Exposure Bracket

You choose:

✔ Number of shots
✔ EV spacing

Then press the shutter once to capture the full sequence.

Common Mistakes When Using Exposure Bracketing Mode ❌

Using High ISO

Creates noise in shadows.

Changing Aperture Between Shots

Causes focus inconsistencies.

Shooting Without Stability

Leads to alignment problems.

Bracketing in Low Contrast Scenes

Not always necessary.

Avoiding these mistakes makes bracketing more effective.

Exposure Bracketing Mode for Beginners 🎓

If you’re new to HDR or real estate photography, start with:

📷 3 shots
📏 ±2 EV
🦵 Use a tripod

This simple setup works in most situations.

How Exposure Bracketing Improves Editing 🖥

Bracketed photos give you more flexibility later.

You can:

✔ Merge into HDR
✔ Blend manually
✔ Choose the best single exposure

Bracketing increases creative control.

Final Thoughts 📸✨

So, what is exposure bracketing mode on a camera?

It’s a powerful tool that captures multiple exposures automatically so you can handle tricky lighting with confidence.

It helps you:

✔ Capture more detail
✔ Avoid blown highlights
✔ Brighten shadows cleanly
✔ Create professional HDR images

Once you start using exposure bracketing mode, it quickly becomes one of the most valuable features on your camera.

Because when light gets tricky, bracketing makes things easy.

🚀 Your All-In-One Virtual Experience Stack Starts Here

Share this post
Cloudpano

Choose The Right 360° Camera

Insta360 ONE RS 1-Inch 360 Edition

  • Compact, ready to go anywhere

  • Interchangeable lens that’s upgradeable

  • Dual 1-inch sensors for improved clarity and low light performance

  • Dynamic range and 6K 360° capture

  • 360° photo resolution at 21MP

Learn More

Insta360 X4

  • 8K 360° video recording for ultra-detailed visuals.

  • 4K single-lens mode for traditional wide-angle shots.

  • Invisible selfie stick effect for drone-like perspectives.

  • 2.5-inch touchscreen with Gorilla Glass protection.

  • Waterproof up to 33ft for underwater shooting.

Learn More

Ricoh Theta Z1

  • 360° photo resolution in 23MP

  • Slim design at 24 mm thick

  • Built-in image stabilization for smooth video capture.

  • Internal 19GB storage for photo and video storage.

  • Wireless connectivity for remote control and sharing.

Learn More

Ricoh Theta X

  • 60MP 360° still images for high-resolution photography.

  • 5.7K 360° video recording at 30fps.

  • 2.25-inch touchscreen for intuitive control.

  • USB Type-C port for fast charging and data transfer.

  • MicroSD card slot for expandable storage.

Learn More
Property Marketing
Allows potential buyers to explore properties in detail from anywhere, enhancing the real estate marketing process.
Automotive Spins
Create an interactive virtual showroom and engage affluent digital buyers with live 360º video calls, all through the CloudPano mobile app for a complete automotive sales solution.
Interactive Floor Plans
Create 2D and 3D floor plans with measurements in 4 minutes or less, all from your phone. Download the Floor Plan Scanner app and get your first scan free.

360 Virtual Tours With CloudPano.com. Get Started Today.

Try it free. No credit card required. Instant set-up.

Try it free
Latest posts

See our other posts

Interviews, tips, guides, industry best practices, and news.

Property Manager Video Hub: Scaling Rental Visibility with AI Photo-to-Video Workflows

This article explains how property managers can use PhotoAIVideo to build a property manager video hub: a repeatable system for turning rental photos, amenity images, floor plans, exterior shots, and neighborhood visuals into reusable rental marketing videos. The main idea is that property managers do not just need more listing exposure. They need clearer visual answers that help renters decide whether to schedule a tour. PhotoAIVideo is positioned as a practical tool for creating: Unit availability videos Amenity highlight videos Neighborhood videos Tour reminder clips Leasing follow-up videos Owner marketing proof videos Social media rental teasers Application or availability reminder videos Key takeaways: Property managers already have the media they need; the challenge is organizing it and turning it into reusable video assets. A video hub helps teams create consistent videos across units, floor plans, amenities, communities, and owner updates. Rental videos can reduce friction by answering renter questions about layout, condition, amenities, parking, pet features, and community feel. One rental photo set can become multiple video outputs for listings, social media, email, text follow-up, tour reminders, and owner reporting. Photographers can sell AI rental video packages to property managers as an upsell. Brokerages with property management divisions can use the same workflow to standardize leasing content. The article ends with a step-by-step process, video hub framework, mistakes to avoid, visual recommendations, FAQs, and a CTA encouraging readers to use PhotoAIVideo to turn rental photos into a scalable video system for rental visibility.
Read post

YouTube Shorts Listing Teasers: The 3-Scene Structure for Higher Property Clicks

This article explains how real estate agents, photographers, brokerages, and property managers can use YouTube Shorts listing teasers to drive more property clicks and showing requests. The main idea is that a YouTube Short should not try to show the entire house. Instead, it should use a simple 3-scene structure: Scene 1: Hook — stop the scroll with the strongest property feature. Scene 2: Proof — show the visuals that support the hook. Scene 3: Click Path — tell the viewer what to do next. The article positions PhotoAIVideo as a practical tool for turning listing photos into short vertical videos for YouTube Shorts, Reels, open house promotion, and listing campaigns. Key takeaways: YouTube Shorts should create curiosity, not replace the full listing video. The strongest property feature should appear first, not necessarily the front exterior. Agents should build each Short around one click reason, such as backyard, kitchen, layout, neighborhood, open house, or price point. One listing can become multiple Shorts instead of one generic video. Photographers can offer YouTube Shorts teaser packs as a video upsell. Brokerages can standardize the 3-scene structure across agents. Property managers can use the same structure to promote rentals and tours. The article ends with practical scripts, visual recommendations, FAQs, a visual placement guide, and a CTA encouraging readers to use PhotoAIVideo to create YouTube Shorts listing teasers from property photos.
Read post

Video Retargeting for Listings: Turning Photo-Based AI Videos into Appointment Follow-Up

This article explains how Realtors, photographers, brokerages, and property managers can use photo-based AI videos as follow-up assets after someone shows interest in a listing. The main idea is that most real estate marketing focuses on getting the first click, but many buyers and sellers need multiple touchpoints before booking a showing or appointment. Video retargeting helps agents re-engage people who already clicked a listing, watched a Reel, opened an email, attended an open house, asked about a property, or went quiet after showing interest. PhotoAIVideo is positioned as a practical tool for turning listing photos into short follow-up videos, including: Feature reminder videos Layout explainer videos Neighborhood fit videos Open house recap videos Price update videos Seller proof videos Showing request videos Rental tour recovery videos Key takeaways: A first-touch listing video introduces the property, while a retargeting video answers the next likely question. Follow-up videos should be short, usually 10–30 seconds, and focused on one action. Agents should send different videos based on behavior, such as email clicks, open house attendance, listing views, or showing interest. A good video follow-up feels helpful, not pushy. Photographers can package retargeting video clips as an upsell. Brokerages can standardize video retargeting workflows across agents. Property managers can use the same strategy to recover rental leads and book tours. The article ends with a simple retargeting sequence, visual recommendations, FAQs, and a CTA encouraging readers to use PhotoAIVideo to turn listing photos into appointment-driving follow-up videos.
Read post