


.png)


If you've built a virtual tour for a property, hotel, museum, or storefront, there's a good chance you've put real effort into making it look great. But there's one piece many tour creators overlook until it's too late: accessibility.
An ADA widget virtual tour setup can help make your tour more accessible to visitors who use screen readers, keyboard navigation, or other assistive technologies — not just visitors who can comfortably see the content and navigate with a mouse.
In this guide, we'll walk through what an ADA widget does, why accessibility matters specifically for virtual tours, and how to add accessibility features to your tour.
An ADA widget is a small piece of software — usually represented by a floating icon in the corner of a webpage or tour — that gives visitors tools to adjust how they experience your content. These tools can include larger text, higher contrast, screen reader support, keyboard navigation options, and more.
For a traditional webpage, implementing these features can be relatively straightforward. For an interactive 360° virtual tour, however, accessibility can be more complex because the "page" is actually a moving, explorable environment rather than a collection of static text and images.
That complexity is exactly why a purpose-built solution matters. CloudPano's ADA compliance widget is designed specifically for virtual tours rather than simply being retrofitted from a generic website plugin.
Standard website accessibility widgets are typically designed for text-heavy pages such as blogs, landing pages, and contact forms. Virtual tours are different. Visitors navigate through 360° spaces, interact with hotspots, and rely heavily on visual cues to move from room to room.
If a visitor uses a screen reader or can't use a mouse, a generic accessibility overlay may not know how to properly describe or facilitate navigation through that interactive experience.
This is where a virtual tour accessibility solution becomes important. It needs to make spatial and visual navigation more understandable to assistive technologies while providing controls that keyboard users can operate.
Step 1: Choose a virtual tour platform with built-in ADA support
Before adding accessibility features, your virtual tour platform needs to support them at the code level. Retrofitting accessibility onto a tour that wasn't designed with it in mind can be difficult and may result in an incomplete experience.
CloudPano provides accessibility features for its virtual tours. You can learn more about how they work on the CloudPano ADA compliance page.
Step 2: Enable the widget in your tour settings
After subscribing to the ADA widget, our support team will activate the feature on your account. Once activated, you can add the widget to your virtual tour by selecting the tour you want to update, clicking Apps, and then choosing ADA Accessibility.
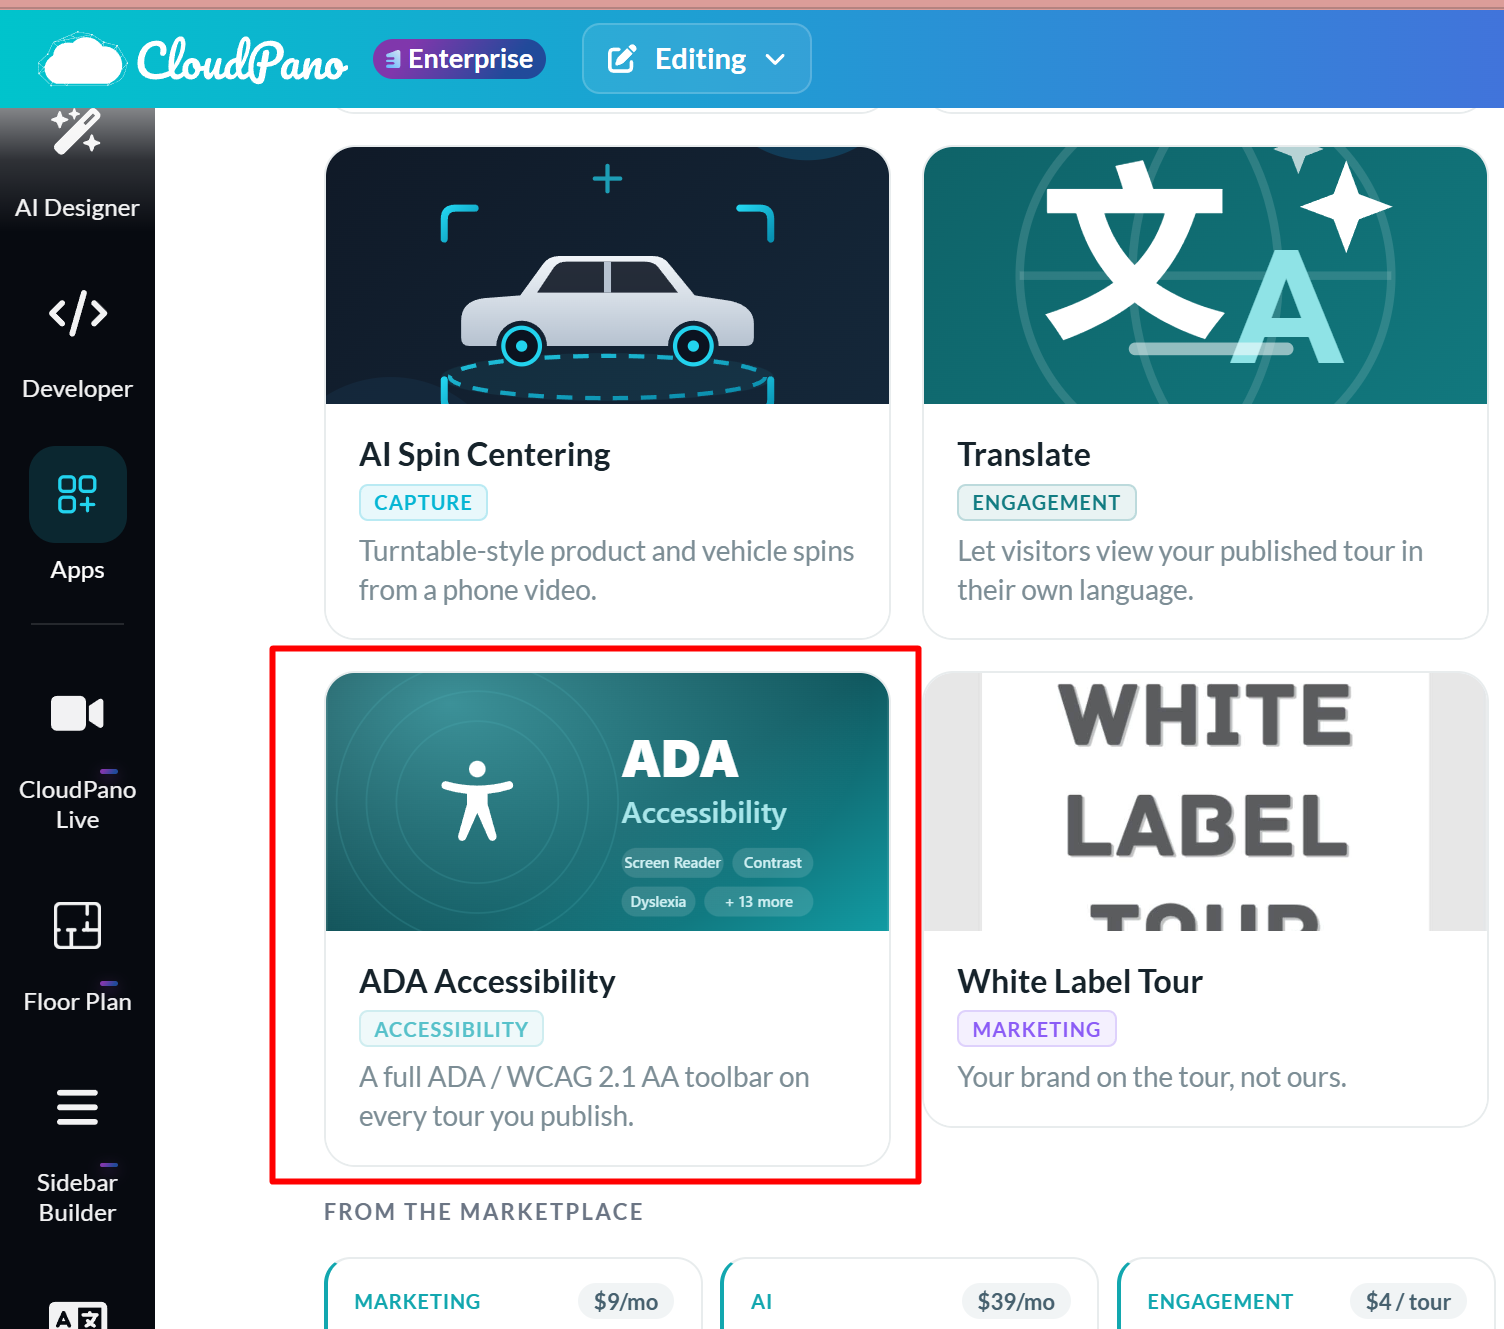
Step 3: Add the ADA widget
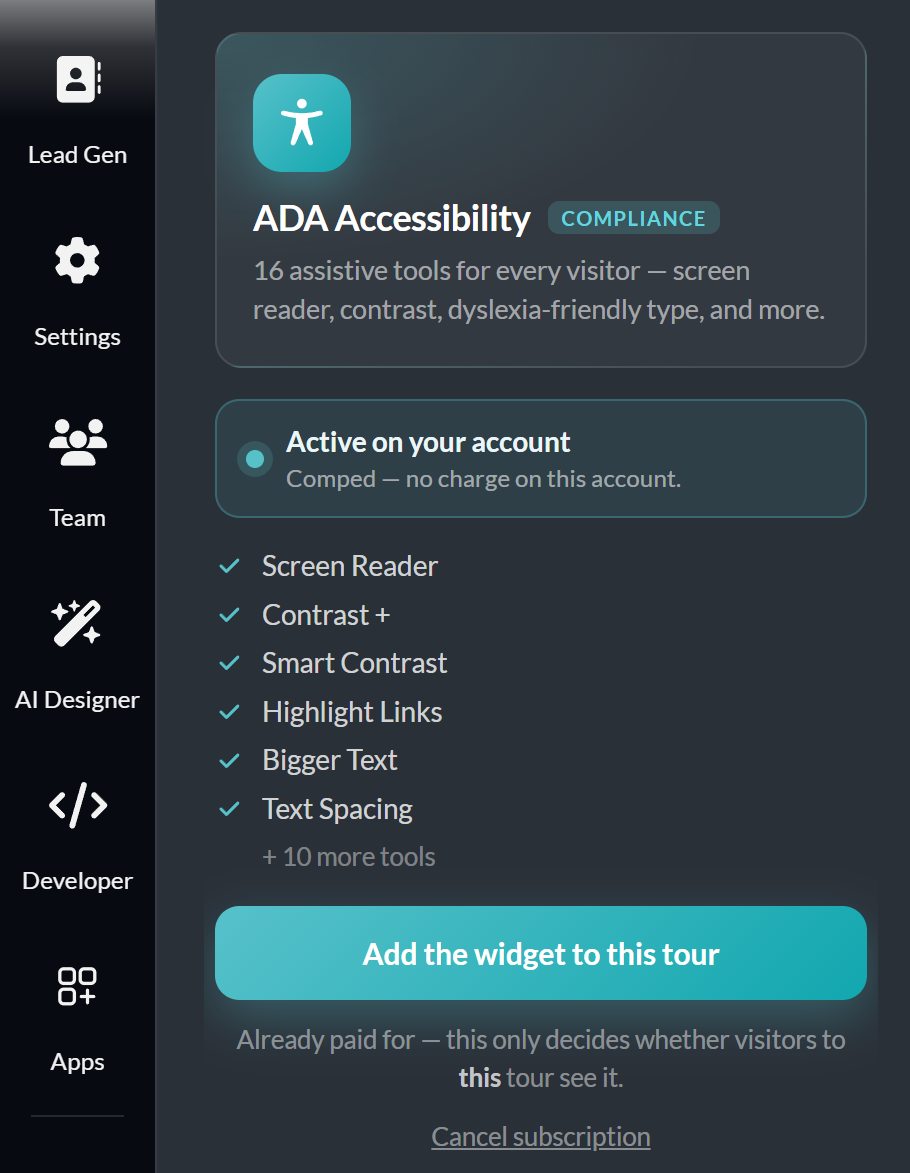
After clicking “ADA Accessibility,” a new page will open where you’ll be prompted to add the ADA widget.
Step 4: Adjust the position of the widget
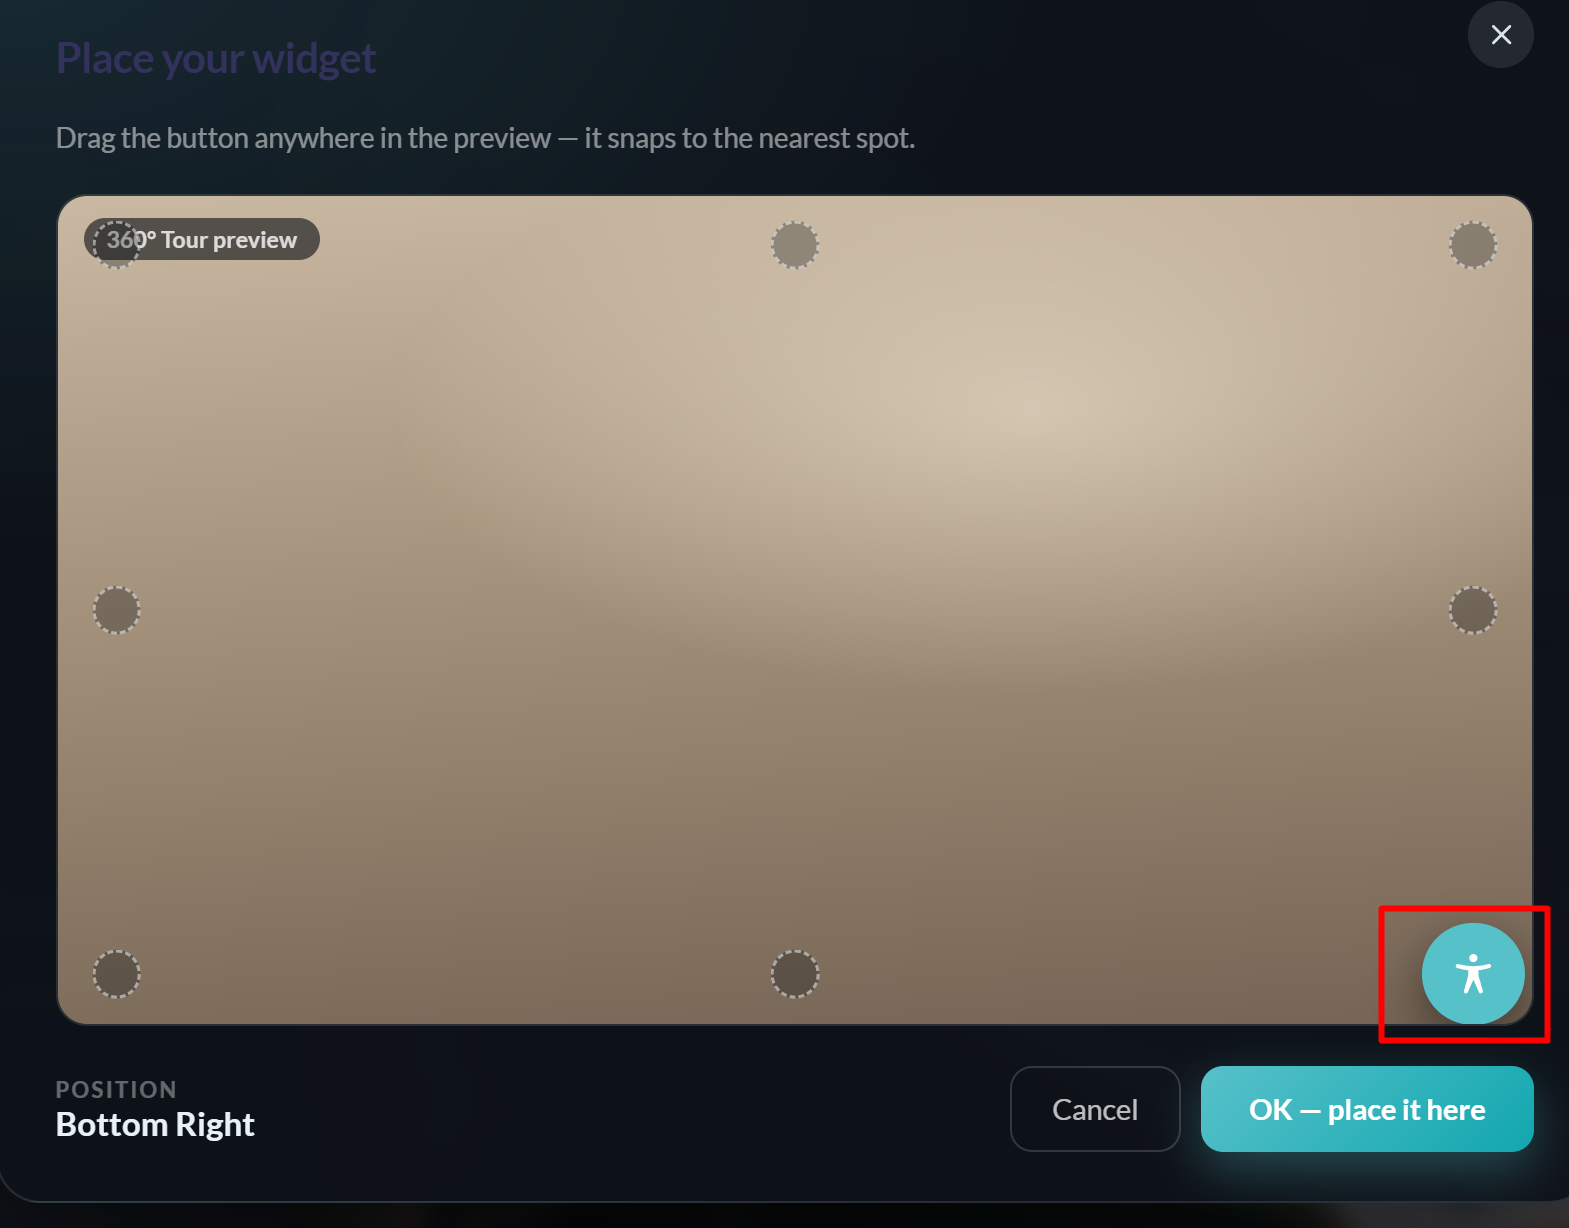
After adding the widget, a new window will open where you can adjust its position on your tour. Once you’ve found your preferred location, click “OK, Place It Here” to save the position.
Step 5: Test keyboard navigation
Open your published tour and try navigating it using only your keyboard. Test keys such as Tab, Enter, Escape, and the arrow keys where applicable.
Check whether users can reach important controls, interact with hotspots and information panels, and navigate through the tour without relying entirely on a mouse.
Step 6: Test with a screen reader
Use a screen reader such as VoiceOver on Mac, Narrator on Windows, or NVDA to navigate through your tour.
Listen to how scene names, hotspot labels, buttons, and navigation instructions are announced. This can help you identify areas where additional descriptions or accessibility improvements may be needed.
Step 7: Publish and monitor
Once your accessibility features are live, periodically test them again — especially after adding new scenes, hotspots, media, or other interactive elements.
Accessibility isn't necessarily a one-time setup. It's something worth maintaining as your tour and its content evolve.
It's easy to frame ADA widgets purely as a legal checkbox, but accessibility has broader benefits.
According to the W3C's Web Content Accessibility Guidelines (WCAG), accessible design can benefit a much wider group of users than those with permanent disabilities. This can include people with temporary or situational limitations, older users, and people interacting with content under less-than-ideal circumstances.
The guidance available through ADA.gov also emphasizes the importance of making web content accessible to people with disabilities.
For businesses that rely on virtual tours — including real estate agencies, hotels, museums, and retail spaces — improving accessibility means giving more visitors the opportunity to engage with their content and creating a more inclusive overall experience.
Resources from WebAIM can also help businesses and creators better understand web accessibility principles, testing methods, and best practices.
If you're building or already managing a virtual tour, improving its accessibility is a worthwhile step toward creating a better experience for a broader audience.
Start by reviewing the accessibility tools available within your virtual tour platform, enabling the appropriate features, and testing the finished experience with keyboard navigation and assistive technologies.
Explore how CloudPano approaches accessibility on its ADA compliance page, or browse the full set of CloudPano features to see how accessibility fits alongside the rest of the platform.


Compact, ready to go anywhere
Interchangeable lens that’s upgradeable
Dual 1-inch sensors for improved clarity and low light performance
Dynamic range and 6K 360° capture
360° photo resolution at 21MP

8K 360° video recording for ultra-detailed visuals.
4K single-lens mode for traditional wide-angle shots.
Invisible selfie stick effect for drone-like perspectives.
2.5-inch touchscreen with Gorilla Glass protection.
Waterproof up to 33ft for underwater shooting.

360° photo resolution in 23MP
Slim design at 24 mm thick
Built-in image stabilization for smooth video capture.
Internal 19GB storage for photo and video storage.
Wireless connectivity for remote control and sharing.

60MP 360° still images for high-resolution photography.
5.7K 360° video recording at 30fps.
2.25-inch touchscreen for intuitive control.
USB Type-C port for fast charging and data transfer.
MicroSD card slot for expandable storage.
.png)

.png)

Try it free. No credit card required. Instant set-up.






.svg)


.svg)