


.png)

A Simple Guide to Choosing the Right Number of Bracketed Photos
If you’ve started learning HDR or real estate photography, you’ve probably asked the big question: how many bracketed photos should I take?
It’s one of the most common questions beginners and even experienced photographers ask. Shoot too few, and you lose detail. Shoot too many, and you slow down your workflow for no reason.
This guide breaks down how many bracketed photos you really need in different situations, why the number matters, and how to find the perfect balance for clean, natural HDR results. Let’s dive in. 🚀
Bracketed photos are multiple shots of the same scene taken at different brightness levels.
Instead of one image, you capture several exposures:
📷 A darker shot for bright highlights
📷 A middle exposure for balanced tones
📷 A brighter shot for shadows
These are later combined into one HDR image or selectively blended.
So when we talk about how many bracketed photos to take, we’re talking about how many exposure levels you need to cover the full range of light in a scene.
Every scene has a different dynamic range — the difference between the brightest and darkest parts.
If you don’t capture enough exposures:
❌ Windows blow out
❌ Shadows get noisy
❌ Important details disappear
If you shoot too many exposures:
⏳ Editing takes longer
💾 Files pile up
⚡ Workflow slows down
Finding the sweet spot is key to efficient HDR photography.
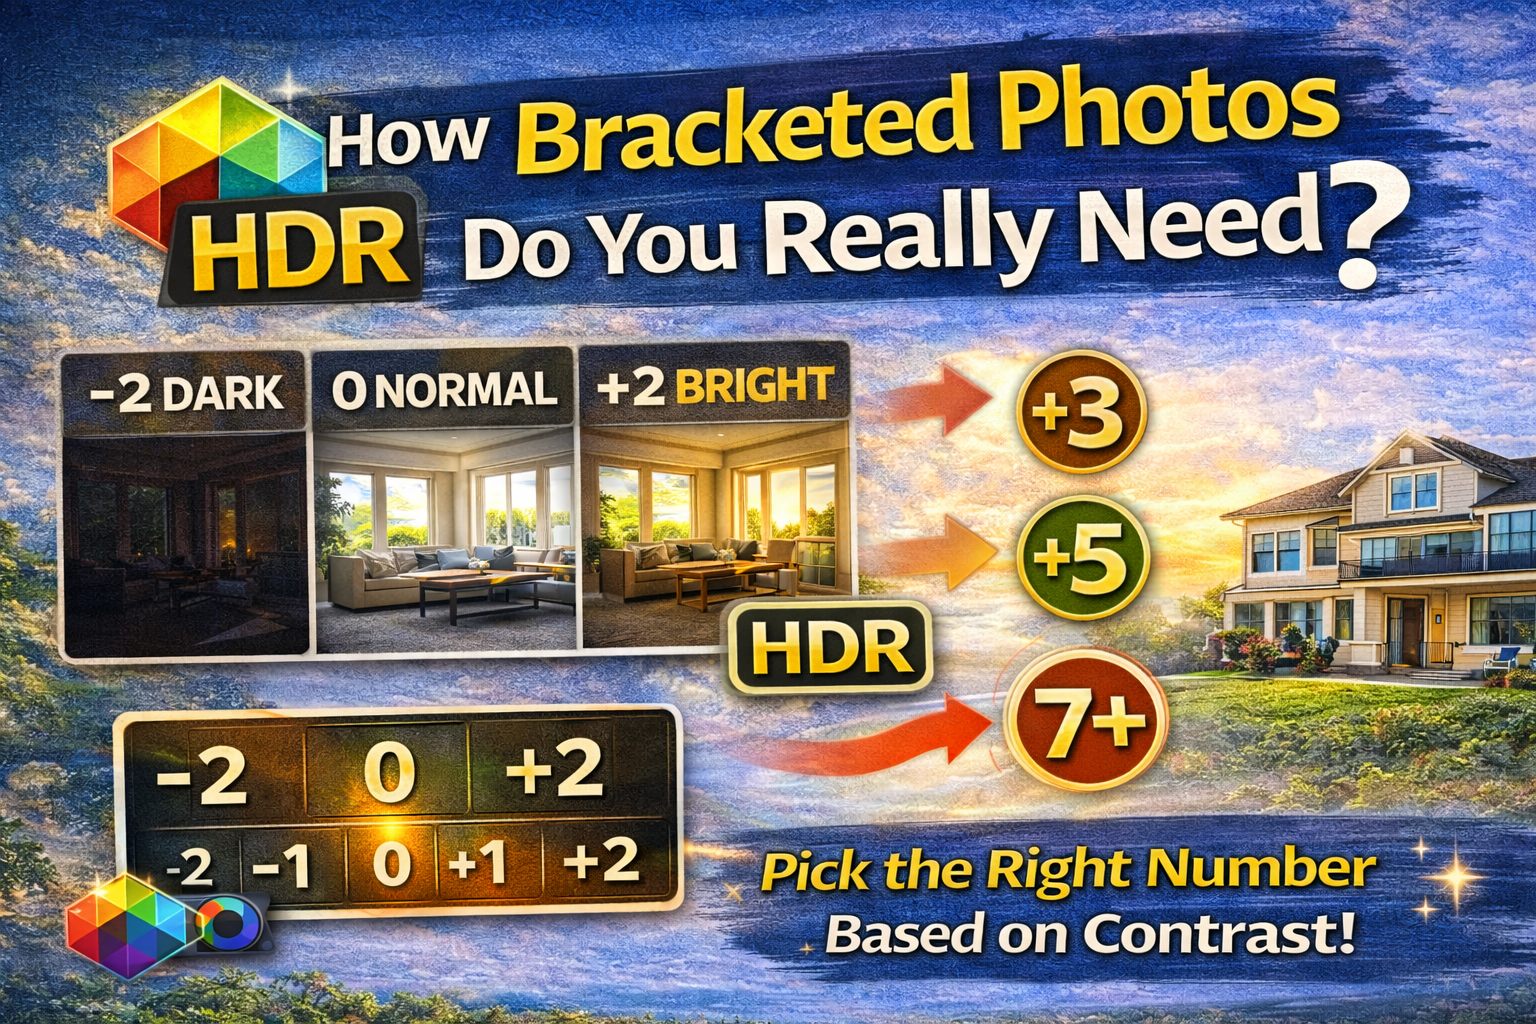
For most real estate and interior photographers, the standard answer to how many bracketed photos is:
👉 3 bracketed photos
These usually include:
• One dark exposure
• One normal exposure
• One bright exposure
This works well for scenes with moderate contrast, like rooms without huge windows or harsh sunlight.
Three exposures are often sufficient when:
🏠 The room has even lighting
🪟 Windows are not extremely bright
🌥 The day is cloudy or overcast
💡 Interior lights help balance shadows
In these situations, 3 bracketed photos provide enough detail in highlights and shadows without overcomplicating your workflow.
For many photographers, 5 exposures become the go-to answer for how many bracketed photos to take in real estate.
Five brackets typically include:
-2 stops
-1 stop
0
+1 stop
+2 stops
This setup is ideal when:
☀ Bright sunlight is pouring through windows
🛋 The room has deep shadow areas
🏡 You’re shooting a living room with large glass doors
Five exposures capture more light detail, which leads to smoother HDR blends and more natural results.
Some extreme lighting situations require more coverage.
You might need 7+ bracketed photos when:
🌅 Shooting toward a bright sunset
🏠 Homes with floor-to-ceiling windows
🏢 Luxury interiors with dramatic lighting
🪞 Rooms with reflective surfaces and deep shadows
These scenes have a huge dynamic range, and capturing more exposures helps ensure you don’t lose highlight or shadow detail.
There’s no single universal number. The best answer to how many bracketed photos depends on:
✔ Lighting contrast
✔ Window brightness
✔ Shadow depth
✔ Your editing style
But as a rule of thumb:
3 = Low to moderate contrast
5 = Standard real estate interiors
7+ = Extreme lighting scenes
It’s tempting to think more exposures = better results.
But shooting too many bracketed photos can create problems:
🕒 Longer editing times
💻 Larger file storage needs
🎭 More chance of ghosting from movement
⚙ Slower processing in HDR software
If 5 exposures cover the full light range, shooting 9 doesn’t improve the image — it just slows you down.
After shooting, review your histogram.
You want to make sure:
📊 The darkest exposure captures highlight detail
📊 The brightest exposure captures shadow detail
If both ends of the light spectrum are covered, you’ve answered the question of how many bracketed photos you needed for that scene.
Usually 5 exposures work best.
Often fine with 3 bracketed photos.
5 exposures help manage bright surfaces and dark cabinets.
3–5 exposures depending on window size and mirror reflections.
Each space answers the how many bracketed photos question differently.
Exterior shots can also benefit from bracketing.
For cloudy days, 3 exposures often work.
For bright sunny days with dark shadows under eaves or trees, 5 exposures help retain detail across the scene.
More bracketed photos increase the chance of movement between shots.
Things like:
🍃 Trees blowing in the wind
🪟 Curtains moving
🚗 Cars passing outside
In these cases, fewer brackets (3–5) reduce ghosting issues.
This is another reason why the answer to how many bracketed photos should stay practical, not excessive.
Fewer exposures = faster editing
More exposures = smoother tonal transitions
Professional photographers balance quality and efficiency when deciding how many bracketed photos to shoot.
✔ Use auto exposure bracketing mode
✔ Keep aperture and ISO constant
✔ Change only shutter speed
✔ Use a tripod for alignment
✔ Review histograms on-site
These habits help you confidently choose how many bracketed photos you need for each scene.
Beginners often start with 3 exposures.
As photographers gain experience, they shift toward 5 exposures as their standard, adjusting up or down based on lighting.
Understanding how many bracketed photos to shoot becomes instinctive over time.
So, how many bracketed photos do you really need?
The answer depends on the light — not a fixed rule.
But for most real estate photography:
🏠 3 exposures work in soft light
🌤 5 exposures handle most interiors
🌞 7+ exposures are for extreme contrast scenes
The goal is simple: capture enough light information to create a natural, balanced HDR image — without slowing down your workflow.
Once you learn to read a scene and judge contrast, deciding how many bracketed photos to take becomes second nature.
And that’s when HDR photography starts feeling easy. 🚀📷

Compact, ready to go anywhere
Interchangeable lens that’s upgradeable
Dual 1-inch sensors for improved clarity and low light performance
Dynamic range and 6K 360° capture
360° photo resolution at 21MP

8K 360° video recording for ultra-detailed visuals.
4K single-lens mode for traditional wide-angle shots.
Invisible selfie stick effect for drone-like perspectives.
2.5-inch touchscreen with Gorilla Glass protection.
Waterproof up to 33ft for underwater shooting.

360° photo resolution in 23MP
Slim design at 24 mm thick
Built-in image stabilization for smooth video capture.
Internal 19GB storage for photo and video storage.
Wireless connectivity for remote control and sharing.

60MP 360° still images for high-resolution photography.
5.7K 360° video recording at 30fps.
2.25-inch touchscreen for intuitive control.
USB Type-C port for fast charging and data transfer.
MicroSD card slot for expandable storage.
.png)
.png)

Try it free. No credit card required. Instant set-up.


