


.png)

How to Master Bracketing Low Light Photography Without Noise or Blur
Low light is one of the toughest challenges photographers face. Scenes at dusk, night interiors, cityscapes, and dimly lit rooms often contain deep shadows, bright highlights, and uneven lighting — all at once.
That’s where bracketing low light photography becomes incredibly useful.
Exposure bracketing in low light helps you capture more detail, reduce noise, and create balanced images even when your camera struggles to see what your eyes can.
In this guide, you’ll learn how exposure bracketing works in dark environments, the right camera settings to use, and practical tips to avoid common low-light mistakes. Let’s brighten things up. ✨
In low light situations, cameras face two big problems:
❌ Not enough light to expose shadows cleanly
❌ Bright artificial lights that easily blow out
If you expose for the shadows, highlights clip.
If you expose for highlights, shadows go black.
That’s why bracketing low light photography is so powerful — it captures multiple exposures so you don’t have to choose.
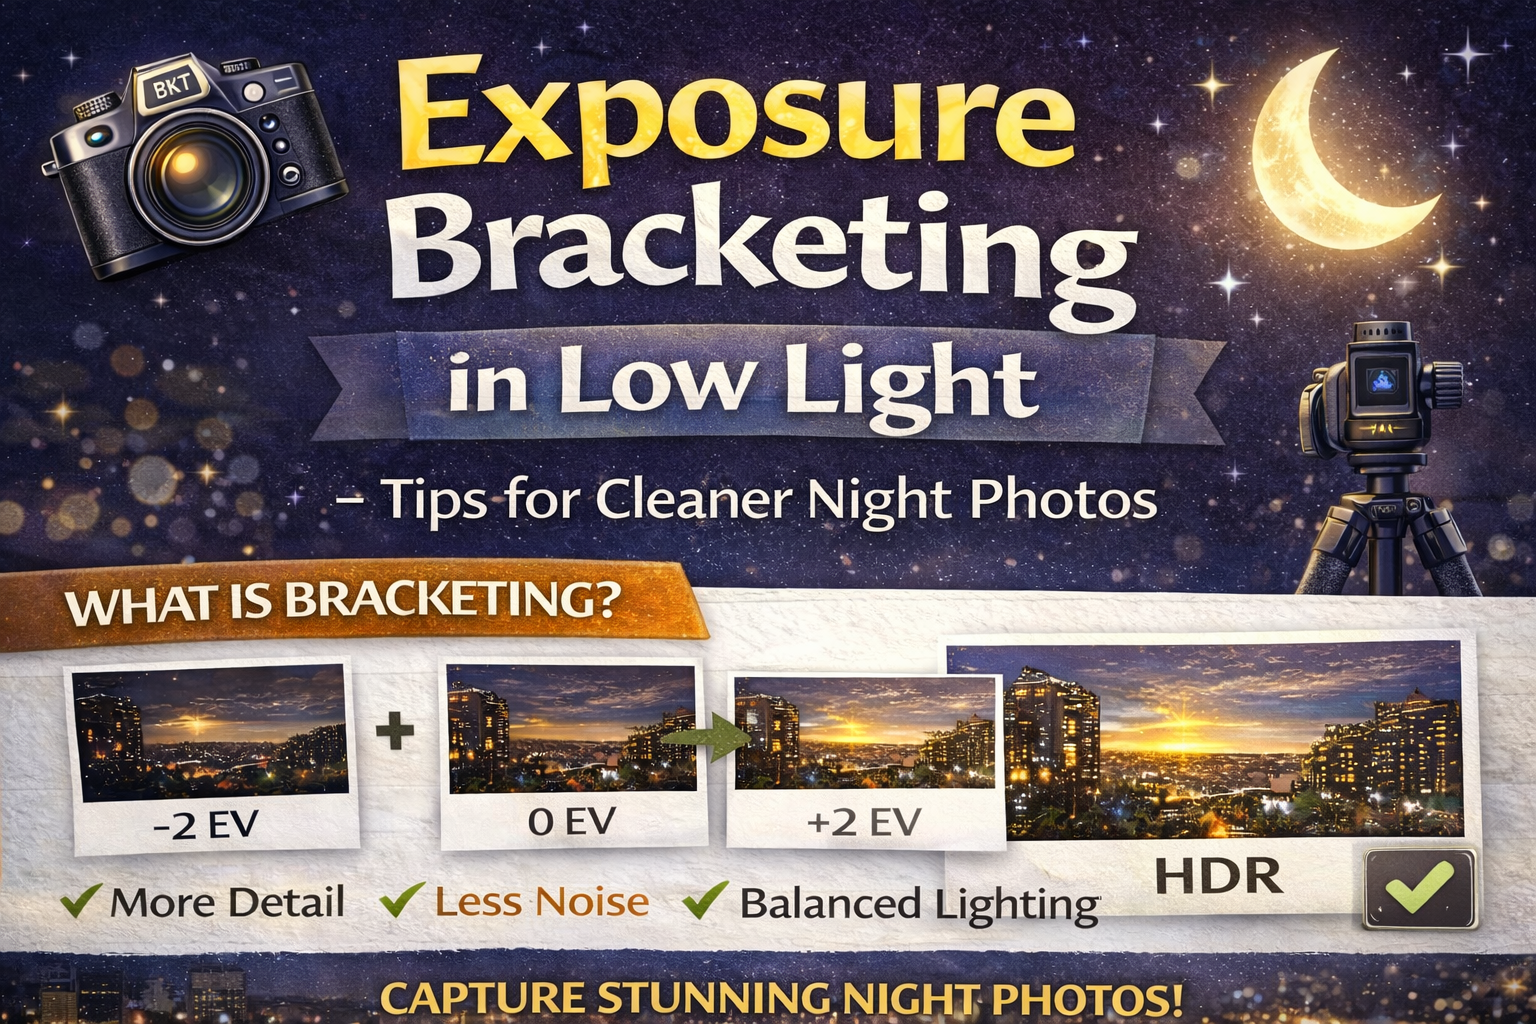
Exposure bracketing means taking several photos of the same scene at different brightness levels.
In low light, this often looks like:
📷 A darker shot to preserve bright lights
📷 A mid exposure for overall balance
📷 A brighter shot to reveal shadow detail
These images can later be merged into a single balanced photo or used individually.
Low light scenes usually have a huge dynamic range — much larger than daylight scenes.
Streetlights, lamps, neon signs, and windows can be extremely bright, while surrounding areas remain very dark.
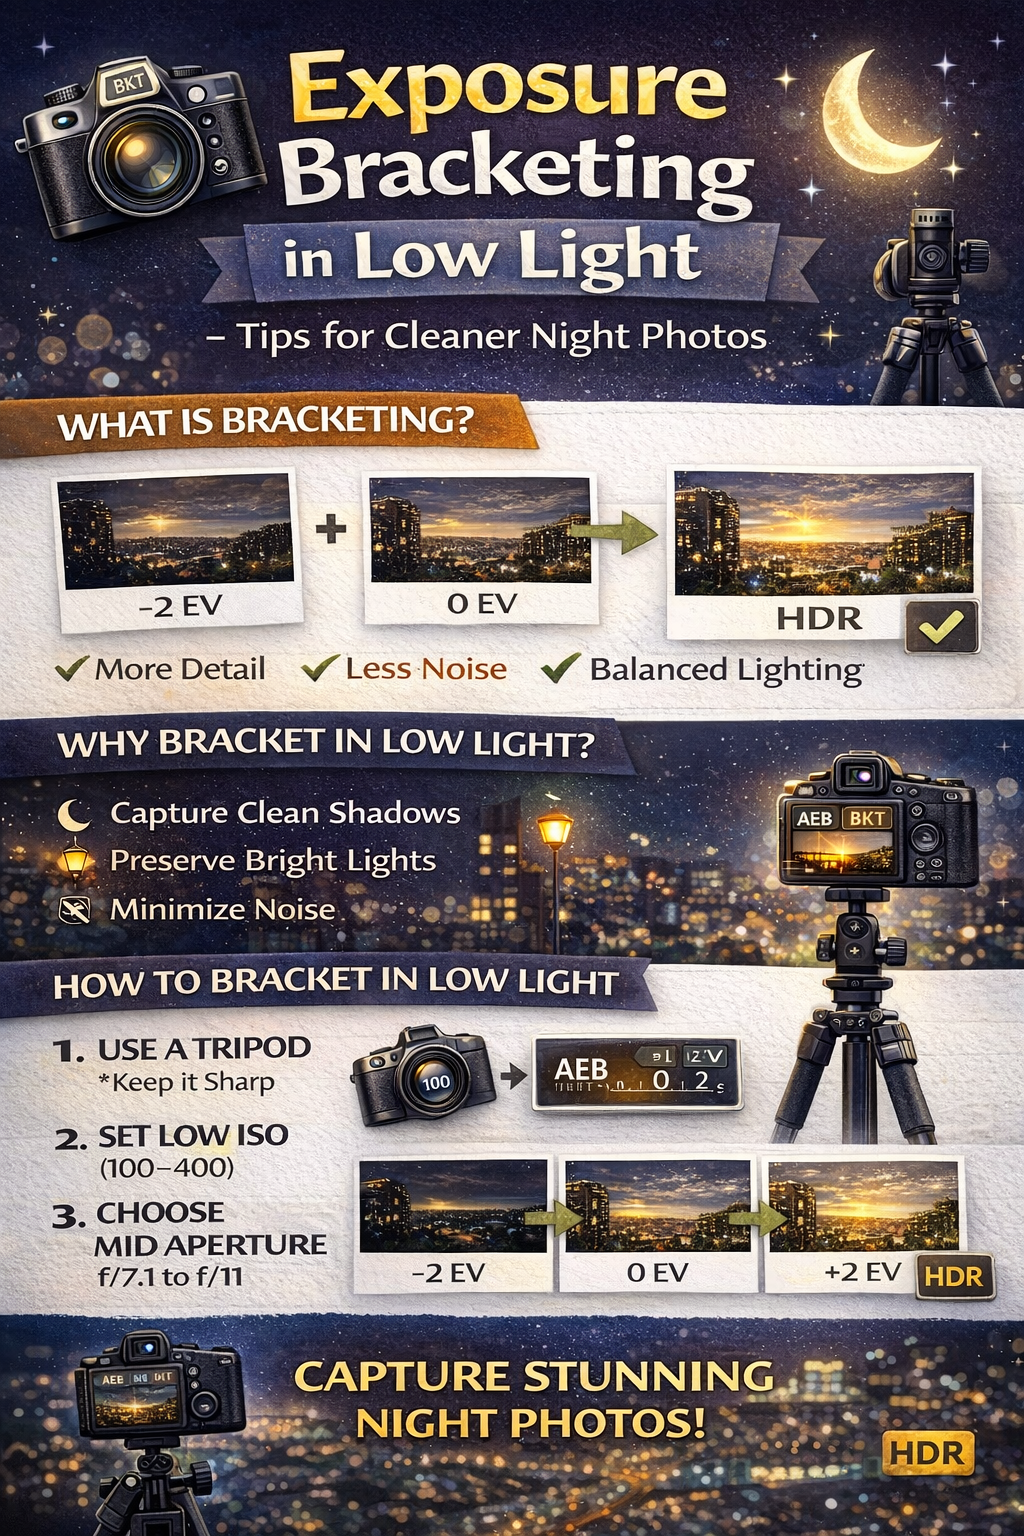
Bracketing low light photography helps by:
✔ Capturing highlight detail without clipping
✔ Preserving shadow information
✔ Reducing the need to push exposure in editing
✔ Producing cleaner, less noisy results
When photographers try to brighten a dark photo later, noise becomes very noticeable.
Bracketing solves this by capturing a brighter exposure in-camera, instead of lifting shadows later in editing.
This is one of the biggest advantages of bracketing low light photography.
Low light means slower shutter speeds. Handholding multiple exposures can lead to blur and misalignment.
A tripod helps you:
✔ Keep images sharp
✔ Maintain perfect alignment
✔ Use longer shutter speeds safely
Tripods are essential for effective low light bracketing.
It’s tempting to raise ISO in the dark, but high ISO increases noise — and HDR merging can amplify it.
For bracketing low light photography, aim for:
ISO 100–400 whenever possible
Let shutter speed handle brightness differences instead.
Use a mid-range aperture for sharpness and depth of field.
Recommended range:
f/7.1 – f/11
This keeps interiors and cityscapes sharp from foreground to background.
In low light bracketing, shutter speed is the setting that changes between exposures.
Example bracket:
📷 1/60 sec (dark exposure)
📷 1/10 sec (mid exposure)
📷 2 sec (bright exposure)
These longer exposures gather light without increasing noise.
Most cameras have an AEB feature that captures multiple exposures quickly.
Set:
📸 3–5 shots
📏 ±2 EV spacing
This is a great starting point for bracketing low light photography.
Low light often requires more exposures than daylight.
Consider 5 or even 7 exposures when:
🏙 Shooting city skylines at night
🏠 Capturing interiors with small light sources
🎡 Photographing bright signs in dark areas
More brackets mean more tonal coverage.
Long exposures can introduce movement issues.
Be aware of:
🚗 Cars moving
🌿 Trees swaying
👤 People walking
If motion is unavoidable, you may need fewer brackets or slightly higher ISO to shorten exposure times.
On a tripod, lens or in-body stabilization can cause slight movement.
Turn it off to keep images perfectly sharp during long exposures.
Pressing the shutter can shake the camera, especially during longer exposures.
Use:
📱 A remote trigger
⏳ A 2-second timer
This ensures clean, sharp bracketed shots.
Artificial lights create mixed color temperatures.
Set a fixed white balance instead of Auto so all bracketed exposures have consistent color.
This helps HDR merging later.
When you bracket in low light, you reduce the need to push exposure in post-processing.
This leads to:
✔ Cleaner shadows
✔ Better highlight detail
✔ More natural night scenes
✔ Less aggressive noise reduction
The result looks more professional and less processed.
Creates unnecessary noise.
Leads to blur and misalignment.
Misses important highlight or shadow detail.
Refocusing between shots causes alignment issues.
Avoiding these mistakes improves your success with bracketing low light photography.
Indoor low light often has warm artificial lighting and deep shadows.
Outdoor low light may include bright city lights and dark skies.
Both benefit from bracketing, but outdoor scenes may require more exposures due to stronger contrast.
Single low-light exposures often look harsh or noisy.
Bracketing captures natural light gradients, producing smoother transitions and more realistic night images.
Low light doesn’t have to mean noisy or blown-out photos.
By using bracketing low light photography, you can:
✔ Capture more detail
✔ Reduce noise
✔ Preserve highlights
✔ Create balanced night images
The key is simple:
📌 Tripod
📌 Low ISO
📌 Mid aperture
📌 Bracketed shutter speeds
Master these steps, and low light becomes one of the most creative and rewarding times to shoot.
Because sometimes, the best photos happen after the sun goes down. 🌃📸

Compact, ready to go anywhere
Interchangeable lens that’s upgradeable
Dual 1-inch sensors for improved clarity and low light performance
Dynamic range and 6K 360° capture
360° photo resolution at 21MP

8K 360° video recording for ultra-detailed visuals.
4K single-lens mode for traditional wide-angle shots.
Invisible selfie stick effect for drone-like perspectives.
2.5-inch touchscreen with Gorilla Glass protection.
Waterproof up to 33ft for underwater shooting.

360° photo resolution in 23MP
Slim design at 24 mm thick
Built-in image stabilization for smooth video capture.
Internal 19GB storage for photo and video storage.
Wireless connectivity for remote control and sharing.

60MP 360° still images for high-resolution photography.
5.7K 360° video recording at 30fps.
2.25-inch touchscreen for intuitive control.
USB Type-C port for fast charging and data transfer.
MicroSD card slot for expandable storage.
.png)
.png)

Try it free. No credit card required. Instant set-up.


