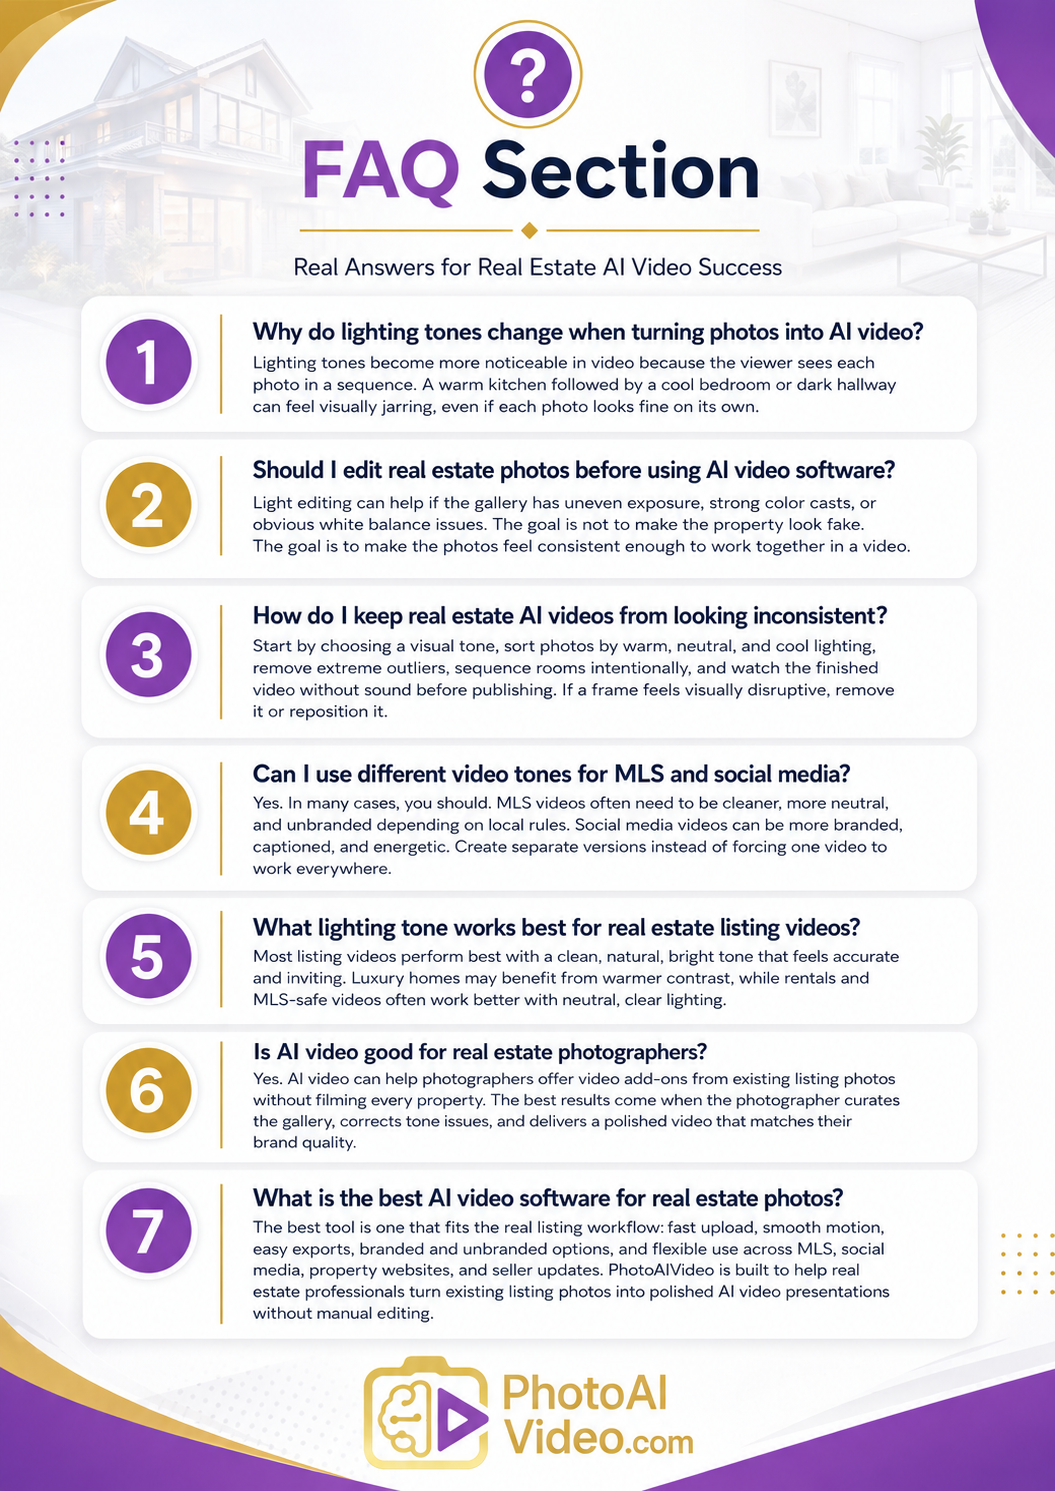
.png)


A listing video can fall apart in five seconds.
Not because the property is bad.
Not because the AI tool failed.
Because the first room looks warm and golden, the second room looks blue and cold, the kitchen looks bright white, the bedroom looks gray, and the backyard suddenly looks like it was shot on a different day.
Buyers may not consciously say, “The white balance is inconsistent.”
But they feel it.
The video feels cheaper. The home feels less polished. The listing feels stitched together instead of intentionally presented.
This is one of the most overlooked problems when agents, photographers, brokerages, and property managers use AI to turn real estate photos into videos. The photos may look fine one by one, but when they are placed into motion, lighting differences become much more obvious.
That is why consistent lighting tone is not just a photography detail. It is a marketing detail.
When you create real estate videos from photos with AI, the goal is not simply to add motion. The goal is to make the property feel cohesive, trustworthy, and professionally marketed from the first frame to the final call to action.
Maintaining consistent lighting tones means making sure the photos used in an AI-generated real estate video feel visually connected.
That includes:

This does not mean every photo must look identical.
A sunset exterior can feel warmer than a kitchen. A shaded bedroom can feel softer than a bright living room. A bathroom may naturally look cooler than a dining area.
The issue is not variation.
The issue is chaos.
A good AI video workflow takes a mixed listing gallery and organizes it into a believable visual rhythm. The viewer should feel like they are moving through one property, not jumping between disconnected photo sets.
For agents and media teams using an AI real estate video generator, this is where the human decision still matters. AI can create motion, pacing, and presentation, but the quality of the final result depends heavily on which photos are selected, how they are ordered, and whether the tones feel consistent enough to support a premium viewing experience.
Real estate buyers make fast visual judgments.
They scroll. They compare. They save. They skip.
Photos and videos do not just show the property. They shape the buyer’s expectations before the showing ever happens.
According to the National Association of Realtors, online search remains a major part of the home-buying process, which means listing media often becomes the first showing experience for buyers. When your visuals feel polished and easy to understand, you create confidence before the buyer reads every detail. You can see this broader digital behavior reflected in NAR’s Profile of Home Buyers and Sellers.
Consistent lighting tones help with three things:
First, they make the property feel more professional. A video with steady visual tone feels like it came from a real marketing process, not a random collection of images.
Second, they reduce buyer friction. If one room feels warm and inviting while the next feels cold and gray, the buyer may start questioning the condition of the property—even if nothing is wrong.
Third, they help teams scale. Brokerages, photographers, and property managers often work with photos from different shoots, vendors, cameras, or lighting conditions. A lighting-tone workflow gives the team a repeatable standard instead of relying on taste alone.
This is especially important for brokerages and real estate media companies trying to standardize marketing quality across many listings. If every agent creates video differently, the brand feels inconsistent. If the team has a shared lighting and sequencing process, the videos feel more intentional.
For busy agents searching for the best AI video software for real estate agents, lighting consistency should be part of the decision. Speed is helpful, but speed without visual quality can create content that technically exists but does not actually improve the listing presentation.
The most common problem is that real estate photos are edited for the gallery, not for the video.
That sounds small, but it changes everything.
A photo gallery lets the viewer pause. They can click one image, then another. Their eyes reset between images.
A video does not give the viewer that same reset. Each photo becomes part of a flowing sequence. So if the living room is warm, the kitchen is cool, the dining room is underexposed, and the exterior is overly bright, the video amplifies those differences.
This actually happens all the time.
A Realtor receives a folder of photos from a photographer. The exterior images were shot near sunset. The kitchen was shot with overhead lights on. The living room had window light. The bedrooms were photographed later in the shoot when the sky changed. The bathroom has a cool LED mirror. The backyard photo looks bright and saturated.
Individually, every image is usable.
Together, they feel uneven.
The agent uploads all of them into a video tool, adds motion, downloads the video, and wonders why it feels “off.”
The issue is not always the AI. The issue is tonal mismatch.
The fix is to treat lighting tone as a pre-production step.
Before generating the video, you need to decide which visual mood the property should have.
Is it bright and airy?
Warm and luxury?
Neutral and MLS-safe?
Modern and clean?
Soft and inviting?
Once you choose the direction, every photo should either support that direction or be excluded from the main video.
PhotoAIVideo is useful because it lets real estate professionals turn existing listing photos into polished video presentations without filming a new walkthrough or learning complex editing software.
That matters for lighting consistency because the workflow can be adjusted quickly.
Instead of spending hours rebuilding a manual video timeline, you can upload curated photos, review how the sequence feels, remove tonal outliers, and create a cleaner version. That makes it easier to test different photo orders and avoid the “random slideshow” problem.
For example, an agent might start with 28 listing photos. After reviewing the tones, they might only use 14 for the main AI video:
That shorter sequence may perform better than a longer video because it feels cohesive.
With PhotoAIVideo’s photo-to-video workflow, agents and photographers can focus on using the strongest photos instead of forcing every image into the video. That is especially helpful when some rooms have mixed lighting, unusual color casts, or inconsistent edits.
PhotoAIVideo also fits different marketing outputs. A brokerage may need a clean listing version, a vertical social version, and a seller update version. A photographer may need a polished add-on product for agents. A property manager may need fast leasing videos from apartment photos that were not all captured under perfect lighting.
For teams that want an AI app to turn property photos into videos, the best results come from pairing the tool with a smart tone-management process.
Do not start by asking, “Which photos do we have?”
Start by asking, “What should this property feel like?”
That one question changes the whole video.
A downtown condo may need a clean, modern tone. A suburban family home may need a bright and welcoming tone. A luxury listing may need warmer contrast and slower pacing. A rental unit may need neutral, accurate, well-lit visuals that help the prospect understand the layout quickly.
Pick one direction:
Then choose photos that fit.
A common mistake is trying to make every property video look “cinematic.” That can work for luxury, but it may feel too dramatic for a rental unit or a basic MLS video. Tone should match the use case.
Color temperature is the warmth or coolness of the photo.
Warm photos feel yellow, orange, or golden.
Cool photos feel blue, gray, or clinical.
Mixed-temperature galleries are common in real estate because homes have several light sources: sunlight, lamps, ceiling lights, LED bulbs, bathroom mirrors, under-cabinet lighting, and outdoor shade.
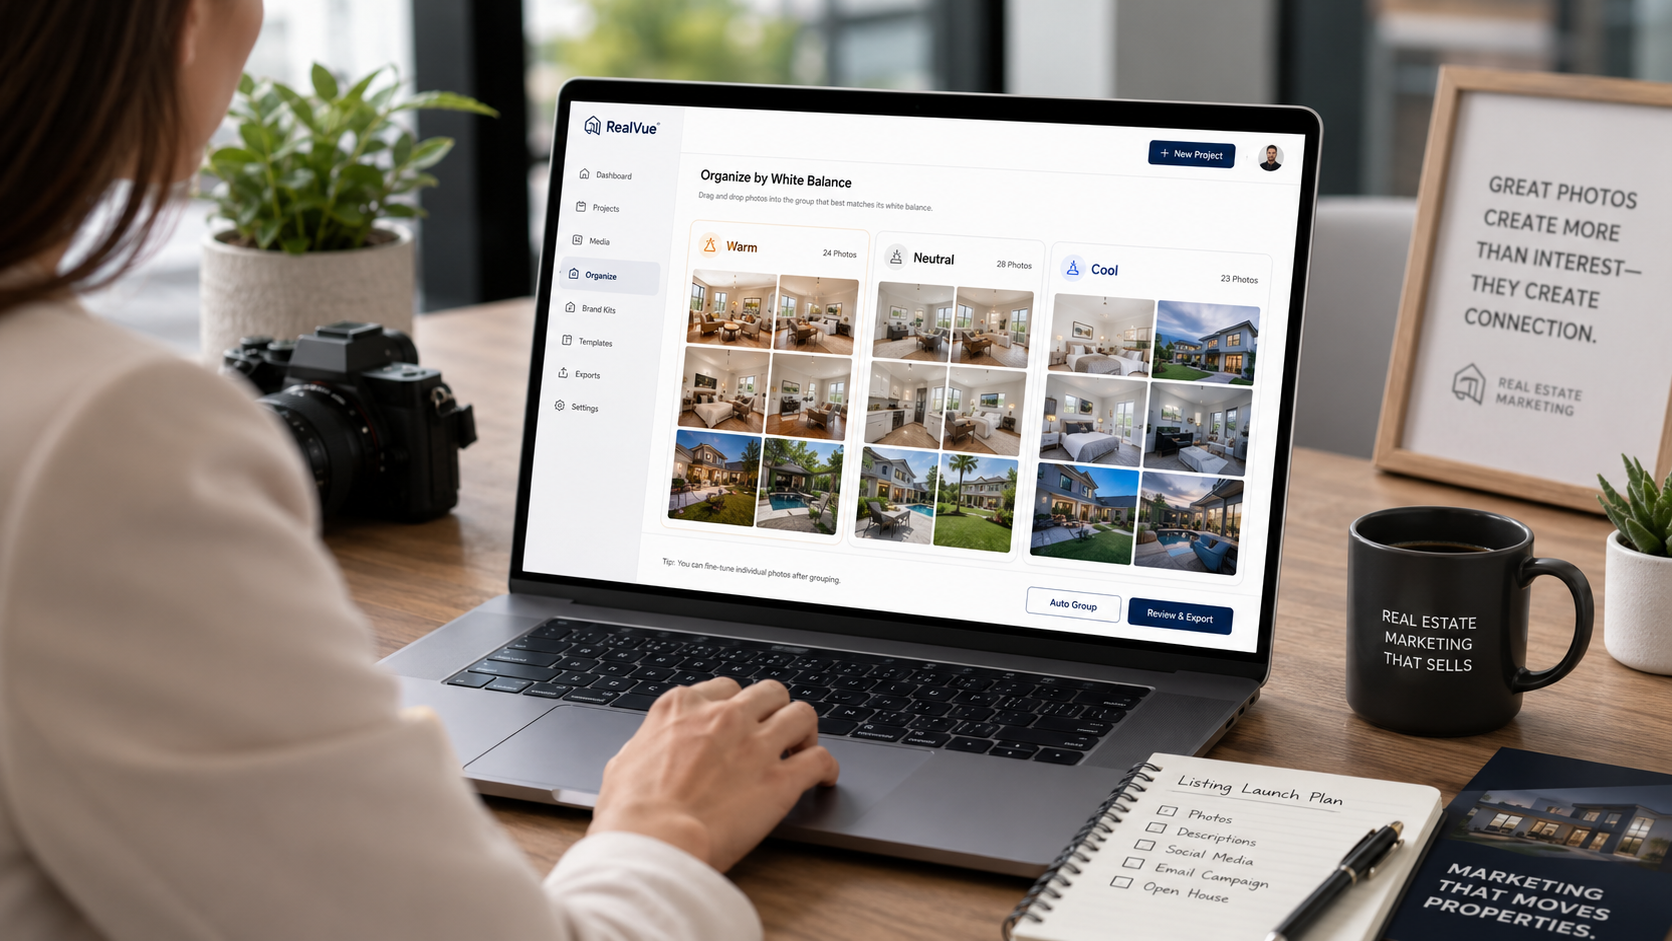
Before creating the video, scan the gallery and group photos into three buckets:
Warm: cozy living rooms, sunset exteriors, lamp-lit bedrooms, warm kitchens.
Neutral: balanced daylight rooms, white walls, clean bathrooms, natural window light.
Cool: shaded exteriors, blue-toned rooms, LED bathrooms, gray bedrooms, cloudy-day interiors.
The goal is not to eliminate every difference. The goal is to avoid harsh jumps.
If most of the property feels warm, do not suddenly insert a cold blue bathroom in the middle without a transition. If most of the property feels bright and neutral, avoid an overly orange dining room unless it is a key selling feature.
Some photos need light correction before they become video assets.
You do not need to over-edit. In fact, you should not.
But you may need to make small adjustments:
The rule is simple: correct enough to create consistency, not enough to misrepresent the property.
Google’s guidance on helpful content emphasizes creating pages and experiences that are useful and trustworthy for people, not just optimized for systems. That same principle applies to listing media. A video should help buyers understand the property honestly, not create a misleading fantasy. See Google’s people-first content guidance for the broader search-quality principle.
Lighting tone is not only about editing. It is also about order.
A video can tolerate one darker room if it is placed carefully.
For example:
Bright exterior → neutral entry → bright living room → slightly warmer dining room → bright kitchen → bedroom → backyard.
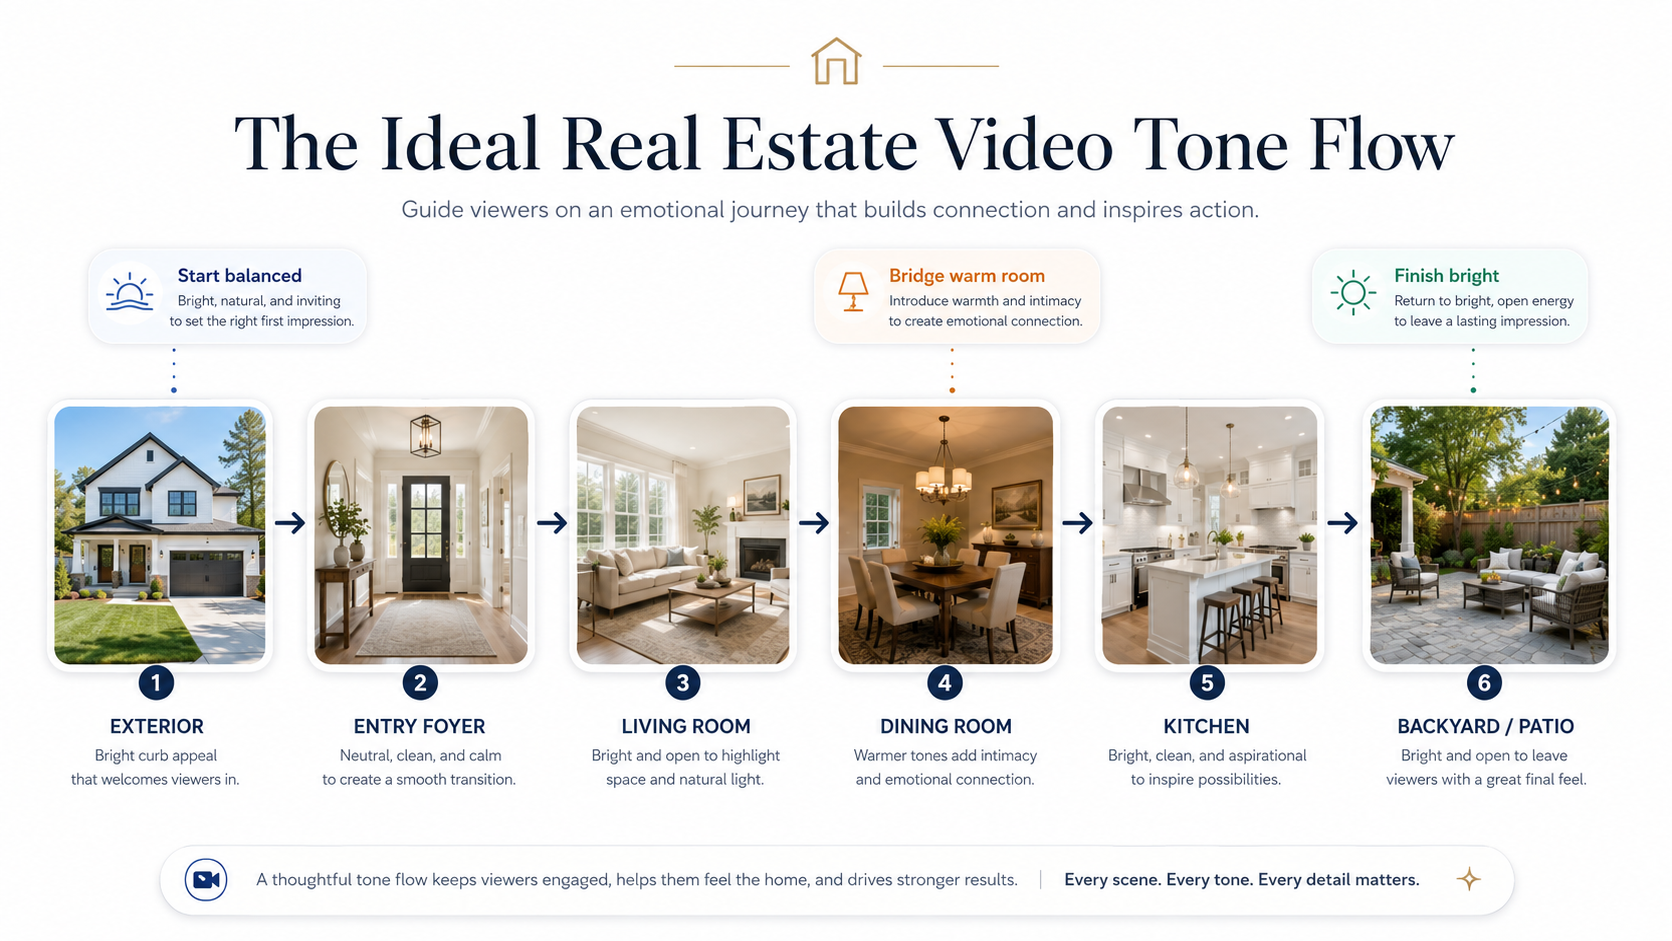
That sequence feels better than:
Bright exterior → dark dining room → bright kitchen → gray bedroom → sunset exterior → cool bathroom → dark hallway.
The second version may use the same photos, but it feels less polished because the viewer is constantly adjusting.
This is where you build a “tone bridge.”
A tone bridge places similar or compatible images next to each other so transitions feel natural. If you need to include a darker room, surround it with balanced images. If you need to move from warm interiors to cool outdoor shots, use a neutral image between them.
This is a practical trick most agents never think about.
It can make the same photo gallery feel more expensive.
Not every photo should receive the same camera movement.
For bright, open rooms, a slow push-in or gentle pan can feel spacious.
For darker rooms, aggressive motion can make the image feel heavier and more artificial. Use slower movement, shorter screen time, or skip the image entirely if it does not support the video.
For kitchens, use motion that follows the room’s lines: island to cabinets, sink to windows, or open layout to dining area.
For bedrooms, keep movement calm and subtle.
For exteriors, use the strongest image either as the opener or closer. Do not let an overly bright exterior overpower the tone of the full video.
Using PhotoAIVideo’s property video tools, the workflow becomes easier because the video can be created from still images without needing to film each movement manually. The creative decision becomes: which photo deserves motion, and what role should it play in the sequence?
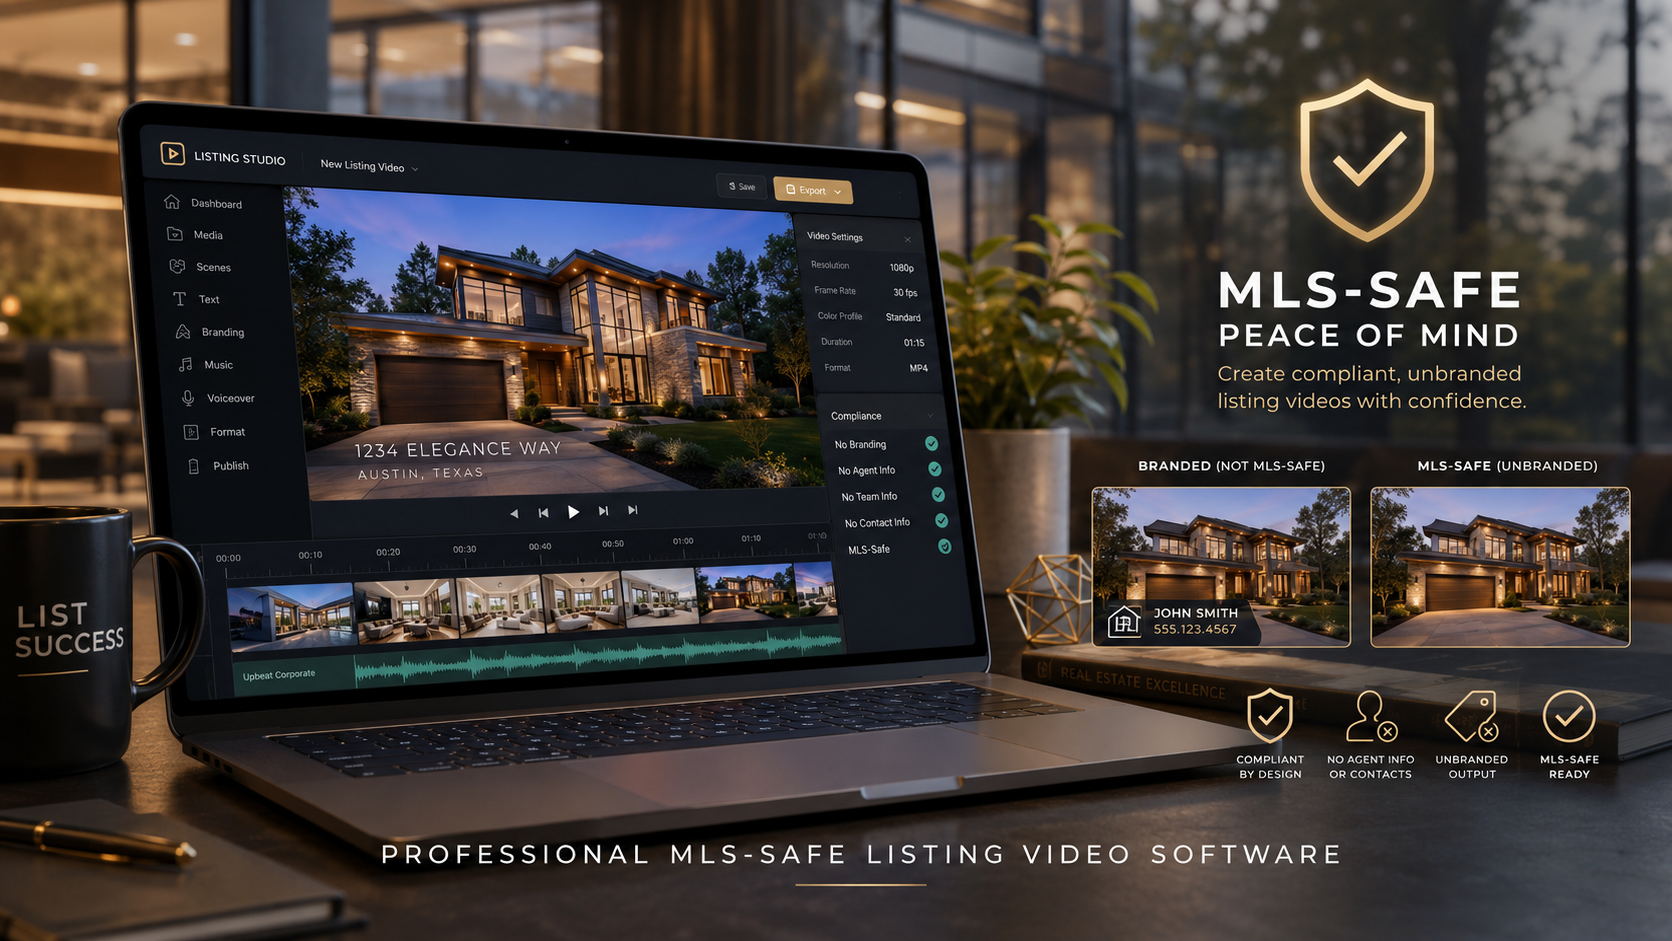
Lighting tone should also match the platform.
An MLS-safe version should usually feel clean, neutral, and accurate. A social version can be more energetic, branded, captioned, and stylized.
This is where real estate video software that works with MLS rules becomes important. MLS requirements vary, so agents should confirm local rules around branding, contact information, URLs, logos, and promotional overlays. The safe approach is to create a clean unbranded version for MLS use and a separate branded version for social media, email, and property websites.
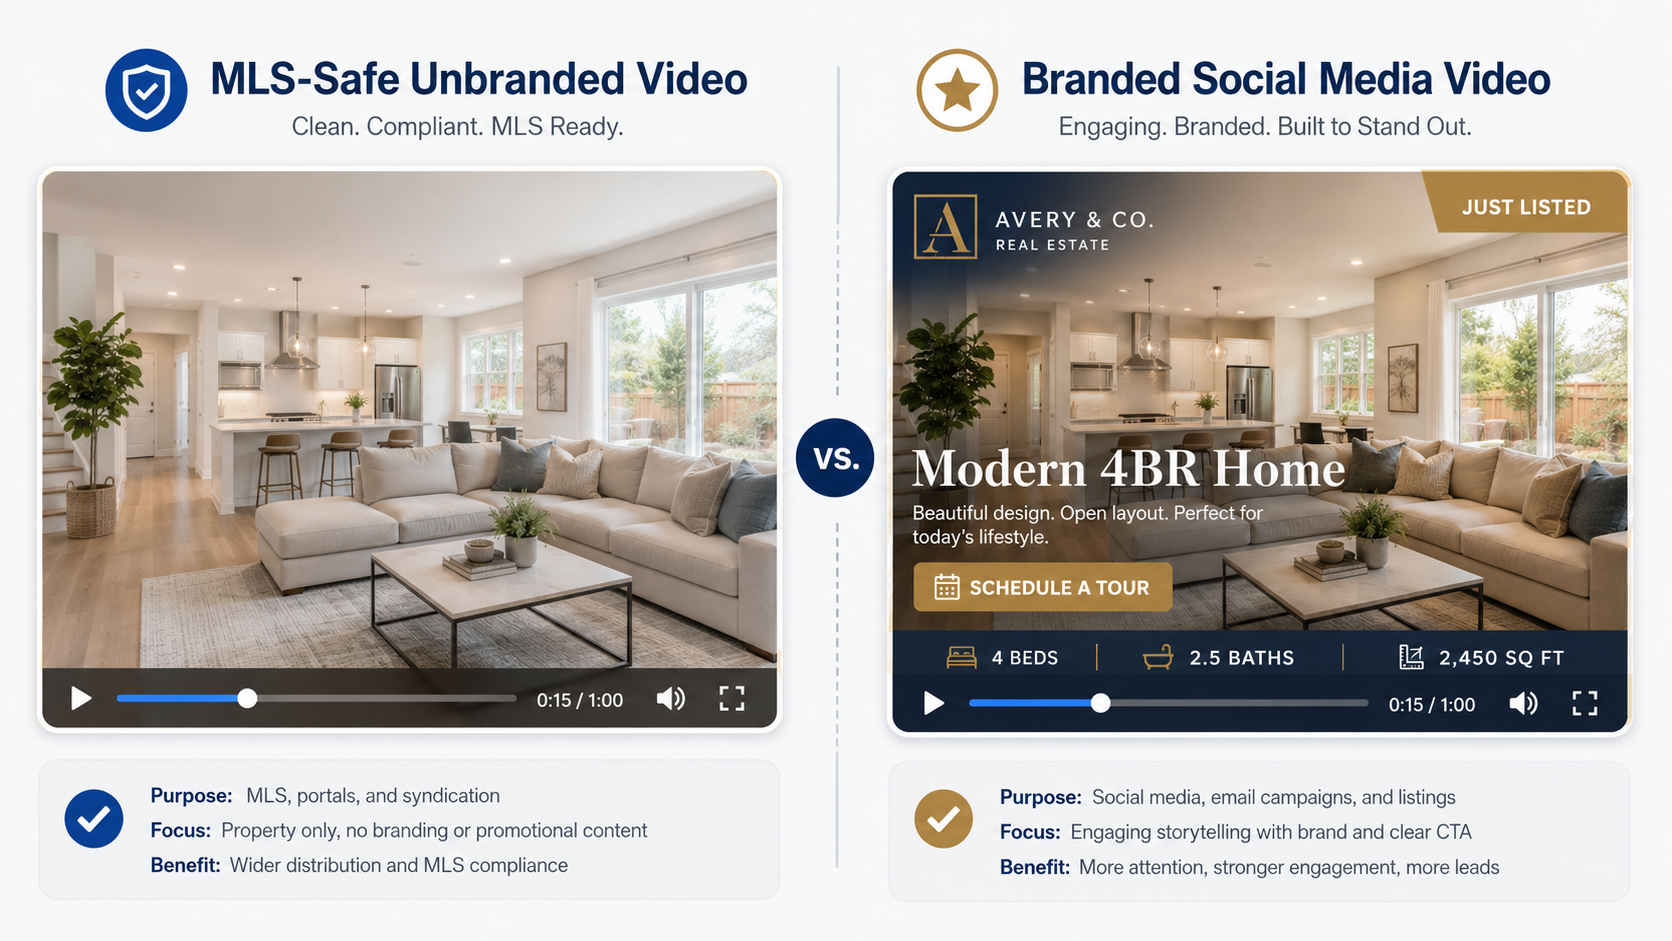
For social media, stronger contrast and captions may work well.
For MLS, restraint is usually better.
If a listing video will be used in multiple places, do not force one version to do every job. Build the MLS-safe version first. Then create the branded social version with extra context and call-to-action elements.
This is one of the simplest quality checks.
Before publishing, watch the full video without sound.
Do not read the captions. Do not focus on the music. Just watch the tones.
Ask:
If something feels off, it is usually one of three things: wrong photo, wrong order, or wrong edit.
Fix that before exporting the final version.
The point is not to make a perfect film.
The point is to make the listing feel intentional.
That is a big difference.
A real estate photographer shoots a home on a cloudy afternoon. The living room is clean, but the bedroom photos are gray. The kitchen has warm pendant lights. The exterior looks blue because the sky was overcast.
Instead of uploading every image into the video, the photographer builds a consistent tone package:
The agent gets a polished video without requiring a reshoot.
This is a strong use case for AI video software for real estate photographers because it turns an existing photo shoot into an additional deliverable while protecting the photographer’s quality standard.
A Realtor wants to impress a seller after the listing goes live.
The gallery is solid, but the home has mixed lighting: a sunny backyard, warm living room, dark dining room, and cool bathrooms.
The agent uses PhotoAIVideo to create a short seller update video. Instead of making it long, the agent selects only the strongest 12 images and keeps the tone warm and inviting.
The seller sees a professional marketing asset and feels like the listing is being actively promoted.
That matters.
Sometimes the video’s first job is not buyer conversion. It is seller confidence.
A brokerage has 40 agents, all creating different kinds of listing content. Some use slideshows. Some hire videographers. Some post raw photos. Some use inconsistent Canva templates.
The brokerage creates a simple lighting-tone standard:
Now the brokerage’s listings feel more unified, even if different agents are involved.
This is where AI real estate marketing software for agents becomes a team system rather than just a single-user convenience.
A property manager has apartment photos from several different leasing agents. Some units were photographed with phones. Some were professionally shot. Some have warm interior bulbs. Others have bright daylight.
The property manager does not need every unit to look like a luxury campaign.
They need consistency.
By grouping similar photos, removing bad lighting mismatches, and creating short AI video previews, the leasing team can make units easier to compare. A prospect reviewing three available apartments sees a consistent presentation instead of a messy folder of random images.
This is also helpful for renewal offers, waitlist updates, and paid leasing campaigns.

An agent wants a vertical listing reel.
The problem: social video is less forgiving. On a phone screen, color shifts are obvious because each frame fills the screen quickly.
For this version, the agent chooses the warmest and brightest images, adds captions sparingly, and avoids darker secondary rooms. The video is not meant to show every detail. It is meant to create interest.
A social-first version can be shorter, more energetic, and more selective.
For agents comparing tools, the best AI real estate video generator for social media is not only the one that creates motion. It is the one that helps them quickly produce content that looks clean on mobile and supports the next action: save, share, message, or schedule a showing.
Agents often assume lighting tone is something the photographer handled.
Sometimes it is. Sometimes it is not.
Even professionally edited photos can feel inconsistent once placed into a video sequence. Video changes the viewing experience. Review the gallery again before generating the video.
Warmth can make a home feel inviting, but too much warmth makes white walls look yellow and kitchens look dated.
This is especially risky for modern homes where buyers expect clean, bright interiors.
Warm is not always premium.
Balanced is premium.
A bright backyard, pool, or sunset exterior can be a great closing shot, but it can also make interior rooms feel dull by comparison.
If the outdoor image is significantly brighter than the interiors, use it strategically. Do not place it in the middle of the video unless it supports the flow.
Bathrooms often have strange lighting: mirrors, LEDs, tile reflections, small windows, or no windows at all.
If a bathroom photo is too cool or too yellow, use only the best one—or skip it in the social version. Buyers can still see the bathroom in the listing gallery.
The video does not need to include every room.
It needs to create interest.
Property managers and agents sometimes combine phone images with professional photos. That can work, but only if the difference is not obvious.
Phone photos often have different sharpness, lens distortion, color, and exposure. In video, those differences stand out.
If you must mix them, group them carefully or reserve phone photos for internal updates instead of public marketing.
If you publish the video on a listing page, blog article, or property marketing page, the surrounding page still matters for discoverability. Google’s image SEO best practices explain the importance of descriptive image context, useful alt text, and standard image elements. For real estate content, that means your visuals should support the page rather than sit there without explanation.
Do not assume a social media video is safe for MLS upload.
MLS rules differ by market. Some may restrict contact info, brokerage branding, agent promotion, URLs, logos, or watermarks. For professional standards and accurate representation, NAR’s Code of Ethics is a useful broader reference, but local MLS rules should always be checked before publishing.
For safer delivery, use an AI tool for making unbranded real estate videos and keep a clean version available for MLS use.

Compact, ready to go anywhere
Interchangeable lens that’s upgradeable
Dual 1-inch sensors for improved clarity and low light performance
Dynamic range and 6K 360° capture
360° photo resolution at 21MP

8K 360° video recording for ultra-detailed visuals.
4K single-lens mode for traditional wide-angle shots.
Invisible selfie stick effect for drone-like perspectives.
2.5-inch touchscreen with Gorilla Glass protection.
Waterproof up to 33ft for underwater shooting.

360° photo resolution in 23MP
Slim design at 24 mm thick
Built-in image stabilization for smooth video capture.
Internal 19GB storage for photo and video storage.
Wireless connectivity for remote control and sharing.

60MP 360° still images for high-resolution photography.
5.7K 360° video recording at 30fps.
2.25-inch touchscreen for intuitive control.
USB Type-C port for fast charging and data transfer.
MicroSD card slot for expandable storage.
.png)
.png)

Try it free. No credit card required. Instant set-up.