How to Add More Photos to an Existing Virtual Tour (No Rebuild Needed)

Cloudpano
July 29, 2026
5 min read
Share this post

How to Add More Photos to an Existing Virtual Tour (No Rebuild Needed)

A virtual tour is rarely as "final" as it feels the day you deliver it. Listings change. Staging gets added. Sellers ask for one more room to be included after the fact. If you've already built and shared a tour, the idea of starting over from scratch is enough to make anyone groan — but with the right workflow, you don't have to. Here's how to expand an existing tour cleanly, without rebuilding it from the ground up.
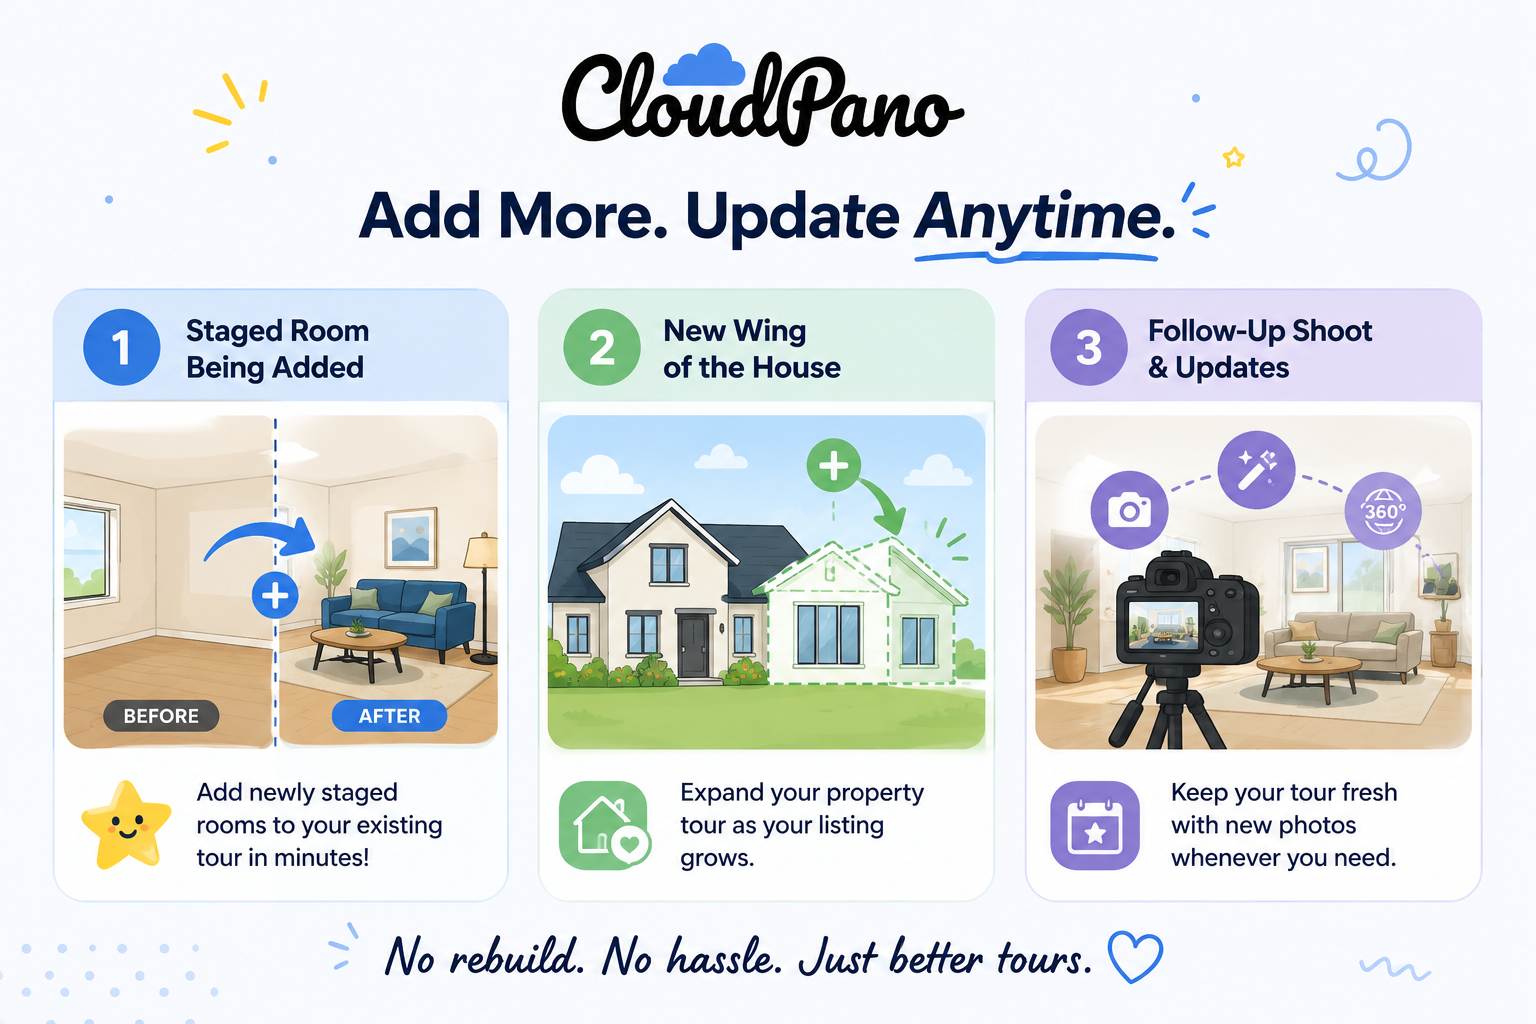
Common Scenarios Where You'll Need to Add Photos

Three illustrated scenarios showing common reasons to add photos to an existing virtual tour

This comes up more often than most photographers expect:

  • A room gets staged after the initial shoot — the tour goes live empty, then the seller stages a bedroom or living area a week later.
  • The listing expands — a basement gets finished, a garage gets converted, or a previously excluded area becomes part of the sale.
  • A follow-up shoot catches something missed — a backyard wasn't captured, or a shot needs to be redone with more coverage.

In every case, the goal is the same: add the new panoramas into the existing tour without touching what's already built and already shared with the client.

Why TourFlash Makes This Easy

This is exactly the kind of situation TourFlash's re-run allowance is built for. Rather than treating a tour as a one-and-done process, you can re-run TourFlash on the same tour up to three separate times. Each re-run scans the tour again — including any newly added panoramas — and rebuilds the auto-connected links accordingly.

In practice, this means you get up to 3 tour updates included on a single property. Add a staged room next week, catch a missed follow-up shot next month, and you're still covered under that same tour without needing to purchase or set up anything from scratch. It's a meaningful safety net for listings that evolve after the initial shoot — which, in real estate, is most of them.

Step-by-Step: Capturing New Panos With Proper Line of Sight

Illustration showing a photographer capturing a new panorama with a clear sightline back to the existing tour

The one thing that matters when adding to an existing tour is making sure your new panoramas connect visually to what's already there. Here's how to do it right:

  1. Review the existing tour before you shoot and note exactly where the new room or area connects — usually a doorway or opening that was previously closed off or unphotographed.
  2. Capture from the connecting point first, positioning your initial new panorama with a clear sightline back into a room that's already in the tour.
  3. Keep doors and pathways open between the new panos and the existing ones — if TourFlash can't establish a visual line of sight, it can't build the connection.
  4. Shoot in a logical sequence, working outward from the connection point rather than jumping around the space.
  5. Confirm at least one new pano has a clear view into the existing tour — this is the anchor point that ties the new material to the old.

Re-Running TourFlash and Confirming the Connections

Progress indicator showing two tour runs used and one remaining out of three allowed updates

Once your new panoramas are captured and uploaded into the same tour project, expanding it is simple:

  1. Upload the new panoramas into the existing tour, alongside the ones already there.
  2. Open the tour and go to Apps → TourFlash.
  3. Run TourFlash again. This uses one of your remaining re-runs and re-scans the entire tour, including both old and new panoramas.
  4. Walk through the finished tour. Specifically check the connection point between the new material and the original tour — this is the spot most likely to need a second look if something wasn't captured with a clean sightline.
  5. Spot-check the rest of the tour too. A re-run typically only affects new connections, but it's worth a quick walkthrough of the whole tour to confirm nothing shifted unexpectedly.

If a connection didn't build the way you expected, it usually comes down to an obstructed sightline on one of the new panos. A quick reshoot of just that connecting image, followed by another re-run (if you have one remaining), typically resolves it.

Communicating the Update to Your Client

The technical side is the easy part — how you present the update matters just as much.

  • Let the client know before you send the link again. A quick note like "I've added the staged primary bedroom to your tour — take a look when you get a chance" keeps things clear and shows attentiveness.
  • Point out exactly what's new. Don't make the client hunt for the change. Mention which room or area was added so they know what to look for.
  • Reuse the same tour link. Since you're updating the existing tour rather than building a new one, the client's original link still works — there's no need to redistribute a new URL to agents, MLS listings, or marketing materials.
  • Set expectations on future updates. If the listing is likely to change again (more staging, more renovation), mention that you can expand your virtual tour again later without a full rebuild — it's a good touchpoint for repeat business.

Handling updates this way tends to leave a strong impression. Realtor.com's own resource hub on listing updates points to how much buyer perception is shaped by a listing that stays current — a tour that keeps pace with staging and renovation changes reflects well on both the agent and the photographer. And if you want a broader look at how photographers typically approach re-shoots and staging follow-ups, PhotoUp's guide is a useful reference for structuring that part of the job.

The Bottom Line

Listings change, and your tour shouldn't have to be rebuilt every time they do. Capture the new panos with a clear line of sight to what's already there, re-run TourFlash, and confirm the connection point before sending the updated link back to your client. It's a five-minute update, not a second shoot's worth of software work.

🚀 Your All‑In‑One Virtual Experience Stack
🎬
PhotoAIVideo
Turn photos into scroll‑stopping AI videos.
Get Started →
🏡
Pictastic
Instantly stage listings with AI.
Try Staging →
🌀
CloudPano
Create stunning 360° tours in minutes.
Launch Tour →
💰
VirtualTourProfit
Build a profitable virtual tour business.
Learn More →
🤝
CloudPano Reseller
Resell AI visual software without building it.
Become a Reseller →
🚗
Auto CloudPano
Sell more vehicles with 360° experiences.
Explore Auto →
🏗️
AI Floor Plan Builder
Generate detailed floor plans with AI.
Build Now →
📐
3D Measure
Capture accurate floor plans & 3D measurements.
Measure Now →
🧠
AI Training Data
Custom AI training data services.
Learn More →
Share this post
Cloudpano

Choose The Right 360° Camera

Insta360 ONE RS 1-Inch 360 Edition

  • Compact, ready to go anywhere

  • Interchangeable lens that’s upgradeable

  • Dual 1-inch sensors for improved clarity and low light performance

  • Dynamic range and 6K 360° capture

  • 360° photo resolution at 21MP

Learn More

Insta360 X4

  • 8K 360° video recording for ultra-detailed visuals.

  • 4K single-lens mode for traditional wide-angle shots.

  • Invisible selfie stick effect for drone-like perspectives.

  • 2.5-inch touchscreen with Gorilla Glass protection.

  • Waterproof up to 33ft for underwater shooting.

Learn More

Ricoh Theta Z1

  • 360° photo resolution in 23MP

  • Slim design at 24 mm thick

  • Built-in image stabilization for smooth video capture.

  • Internal 19GB storage for photo and video storage.

  • Wireless connectivity for remote control and sharing.

Learn More

Ricoh Theta X

  • 60MP 360° still images for high-resolution photography.

  • 5.7K 360° video recording at 30fps.

  • 2.25-inch touchscreen for intuitive control.

  • USB Type-C port for fast charging and data transfer.

  • MicroSD card slot for expandable storage.

Learn More
Property Marketing
Allows potential buyers to explore properties in detail from anywhere, enhancing the real estate marketing process.
Automotive Spins
Create an interactive virtual showroom and engage affluent digital buyers with live 360º video calls, all through the CloudPano mobile app for a complete automotive sales solution.
Interactive Floor Plans
Create 2D and 3D floor plans with measurements in 4 minutes or less, all from your phone. Download the Floor Plan Scanner app and get your first scan free.

360 Virtual Tours With CloudPano.com. Get Started Today.

Try it free. No credit card required. Instant set-up.
Try it free
Latest posts

See our other posts

Interviews, tips, guides, industry best practices, and news.

Cloudpano TourFlash vs Matterport: Comparing Virtual Tour Auto-Connect Options

Both Cloudpano TourFlash and Matterport aim to make virtual tours easier to build. Here’s how they actually compare on cost, workflow, and flexibility.
Read post

Line of Sight Photography for Virtual Tours: The One Rule to Follow

There’s only one real rule for auto-connecting a virtual tour: each pano needs a clear line of sight to the next one. Here’s how to nail it on every shoot.
Read post

How to Add More Photos to an Existing Virtual Tour (No Rebuild Needed)

A listing changes, or you missed a room — here’s how to expand a live virtual tour with new panoramas without rebuilding the whole thing.
Read post