


.png)

Why Using a Tripod for Exposure Bracketing Makes All the Difference
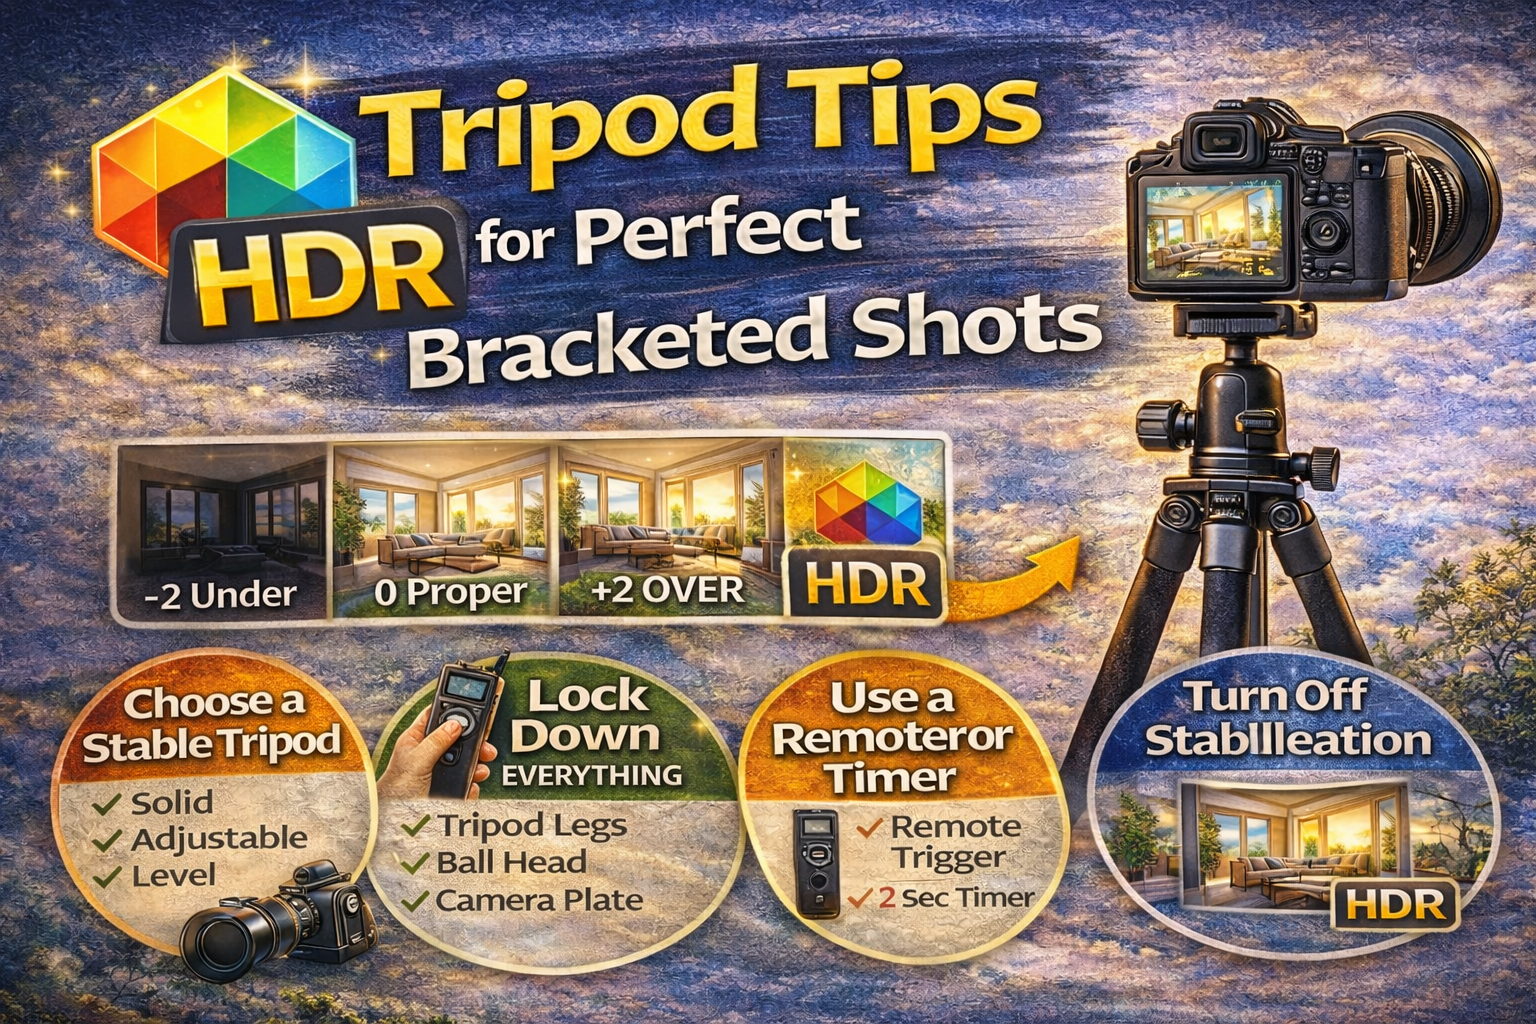
If you want sharp, professional HDR photos, there’s one piece of gear you absolutely can’t skip: a tripod for exposure bracketing.
Bracketing means taking multiple photos of the same scene at different exposures. Those photos are later merged into a balanced HDR image. But if your camera moves between shots — even slightly — you can end up with blurry edges, ghosting, and alignment issues.
In this guide, you’ll learn why a tripod for exposure bracketing is essential, how to use it correctly, and practical tips to ensure every bracketed shot lines up perfectly. Let’s get steady. 🚀
When shooting bracketed exposures, the goal is to capture identical compositions with only brightness changing.
Without a tripod:
❌ Frames don’t align
❌ Edges blur after merging
❌ Software struggles to blend cleanly
❌ Editing time increases
Using a tripod for exposure bracketing keeps every shot perfectly aligned, making your HDR merge faster and cleaner.
Even small hand movements create problems when combining exposures.
You might notice:
• Double edges around furniture
• Blurry window frames
• Ghosting from slight shifts
• Extra noise after alignment corrections
While some software can auto-align images, it’s never as clean as starting with stable shots. A tripod for exposure bracketing prevents these issues before they start.
A tripod doesn’t just hold your camera — it improves image quality in several ways:
✔ Allows slower shutter speeds for low ISO
✔ Keeps composition consistent
✔ Prevents motion blur
✔ Ensures perfect bracket alignment
When capturing interiors or real estate scenes, these advantages make a huge difference.
Not all tripods are equal.
Look for:
Your tripod should feel solid, not flimsy. Lightweight travel tripods may wobble indoors.
Being able to shoot at chest height is ideal for interior photography.
A smooth, secure head lets you frame accurately and lock your composition.
A reliable tripod for exposure bracketing is an investment that pays off on every shoot.
How you use your tripod matters just as much as owning one.
Wider stance = better stability.
This makes the setup less stable. Extend the legs instead.
Use a built-in bubble level or camera grid lines to keep vertical lines straight.
A properly positioned tripod for exposure bracketing prevents subtle tilts and shifts.
Before shooting your bracketed sequence:
✔ Tighten all leg locks
✔ Secure the ball head
✔ Make sure the camera plate is snug
Even small movement between exposures can cause alignment problems.
Pressing the shutter button can shake the camera.
To avoid this:
📱 Use a remote trigger
⏳ Set a 2-second timer
This ensures your tripod for exposure bracketing stays completely still during each shot.
Stabilization systems try to compensate for movement — but on a tripod, they can actually introduce blur.
Before shooting:
❌ Turn off lens stabilization
❌ Disable in-body stabilization
This keeps your bracketed images sharper.
Once you frame your shot, don’t touch the tripod.
Avoid:
• Adjusting composition mid-sequence
• Reframing between exposures
• Leaning on the tripod
Your tripod for exposure bracketing should stay completely untouched until all exposures are finished.
Indoor shoots often mean uneven or slippery floors.
Prevents sliding on tile or hardwood.
Press down slightly to stabilize legs on soft surfaces.
Small stability issues can affect HDR merging later.
If you’re shooting exteriors:
✔ Hang your camera bag from the tripod center hook
✔ Keep legs low and wide
✔ Shield the tripod from strong gusts
Even outside, a solid tripod for exposure bracketing keeps frames aligned.
Zoom into images on your camera screen:
• Look at edges of windows
• Check door frames
• Inspect furniture lines
If alignment looks off, reshoot before moving on.
Your tripod helps, but a quick check ensures success.
For real estate interiors, aim for:
👉 Camera height around chest level
👉 Straight vertical lines
👉 Avoid extreme high or low angles
This height creates natural-looking room proportions and works perfectly with a tripod for exposure bracketing.
Adjusting focus or zoom during bracketing can shift the frame.
Set your composition and focus first, then leave everything alone.
Consistency is key when using a tripod for exposure bracketing.
Stable bracketed shots lead to:
✔ Faster HDR merging
✔ Fewer alignment corrections
✔ Less ghosting
✔ Sharper final images
Using a tripod for exposure bracketing actually saves time in post-production.
Causes subtle drift between exposures.
Reduces stability.
Leads to crooked or unstable shots.
Avoiding these mistakes keeps your HDR workflow smooth.
High-end real estate and architectural photographers rely on tripods for every bracketed shot.
It’s not just about steadiness — it’s about delivering consistent, high-quality results every time.
A tripod for exposure bracketing is as essential as the camera itself.
Perfect bracketed shots start with stability.
Using a tripod for exposure bracketing ensures:
📐 Aligned exposures
🧼 Cleaner merges
🔍 Sharper details
⚡ Faster editing
If you want professional HDR photos, make your tripod part of your standard setup.
Once your camera is rock solid, the rest of the HDR process becomes much easier — and your images will show the difference.

Compact, ready to go anywhere
Interchangeable lens that’s upgradeable
Dual 1-inch sensors for improved clarity and low light performance
Dynamic range and 6K 360° capture
360° photo resolution at 21MP

8K 360° video recording for ultra-detailed visuals.
4K single-lens mode for traditional wide-angle shots.
Invisible selfie stick effect for drone-like perspectives.
2.5-inch touchscreen with Gorilla Glass protection.
Waterproof up to 33ft for underwater shooting.

360° photo resolution in 23MP
Slim design at 24 mm thick
Built-in image stabilization for smooth video capture.
Internal 19GB storage for photo and video storage.
Wireless connectivity for remote control and sharing.

60MP 360° still images for high-resolution photography.
5.7K 360° video recording at 30fps.
2.25-inch touchscreen for intuitive control.
USB Type-C port for fast charging and data transfer.
MicroSD card slot for expandable storage.
.png)
.png)

Try it free. No credit card required. Instant set-up.


