.png)

A Complete Guide to Merge Bracketed Photos for Stunning Real Estate & Interior Images
If you’ve ever taken a photo of a room and struggled to capture both the bright windows and the darker interior, you’ve already discovered why photographers merge bracketed photos into HDR.
High contrast scenes are everywhere in real estate, architecture, and interior photography. The human eye can see detail in both shadows and highlights at the same time — but a camera sensor can’t. That’s where HDR merge bracketed photos techniques come in.
This guide walks you step-by-step through how to use exposure bracketing merge methods to create clean, natural HDR images that look professional and realistic. Let’s break it down. 🚀
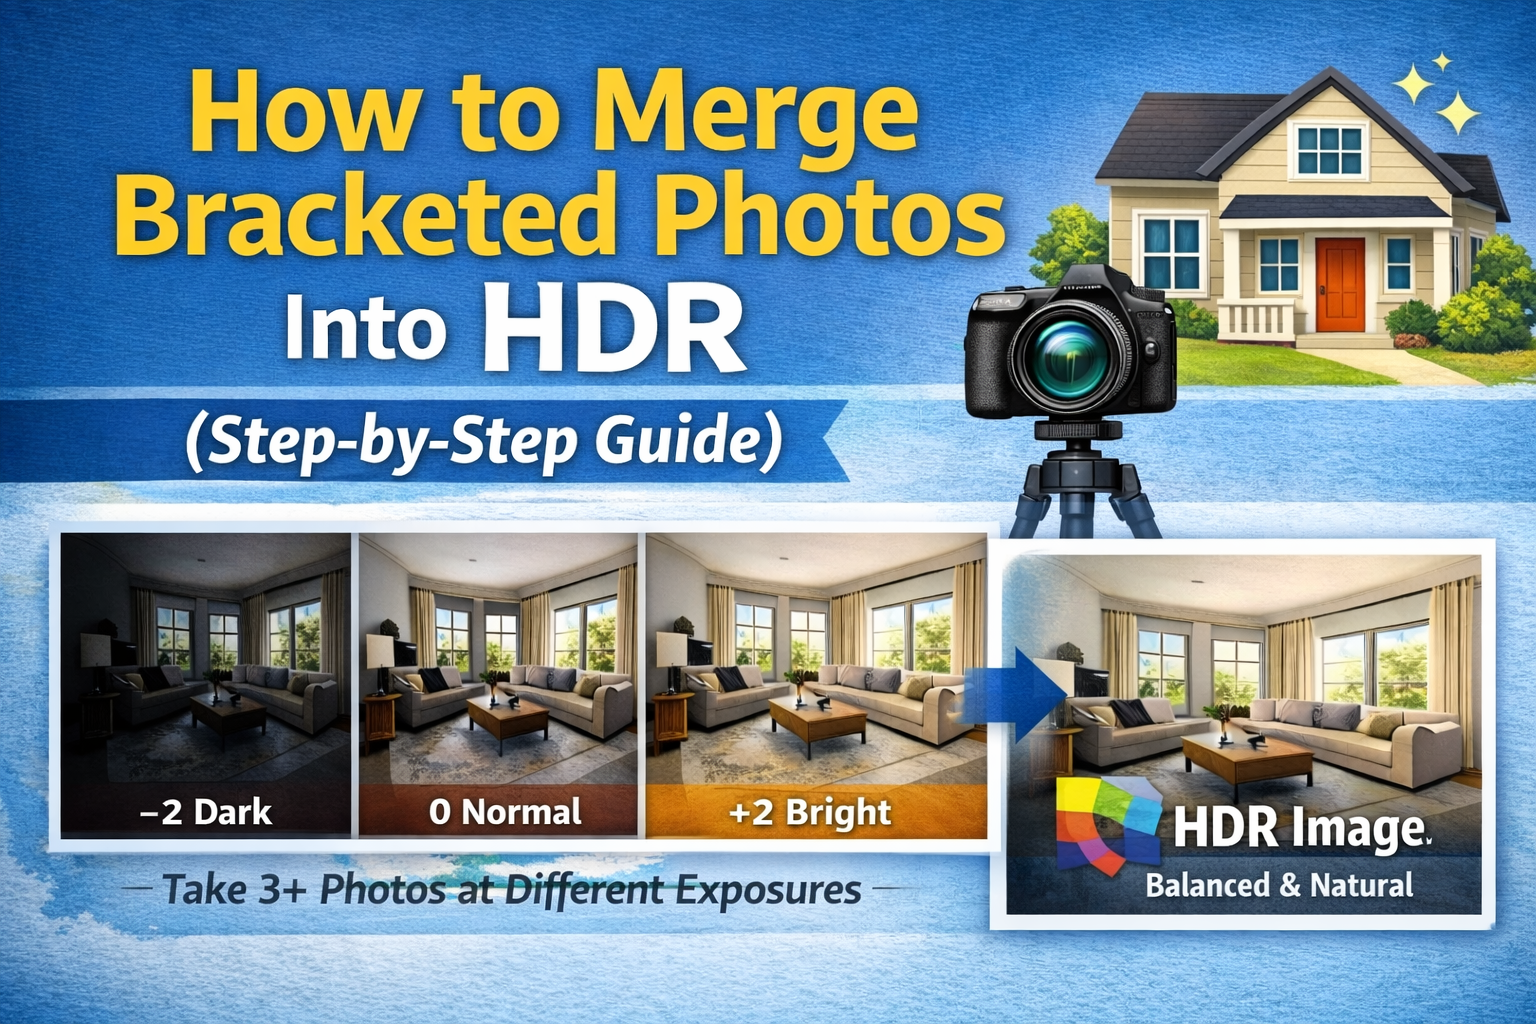
To merge bracketed photos, you combine multiple images of the same scene that were shot at different exposure levels.
Instead of one photo, you take several:
📷 A dark exposure (for bright highlights and windows)
📷 A medium exposure (balanced overall)
📷 A bright exposure (for shadow detail)
Then you blend them into one final image using HDR software. This process is called an HDR merge bracketed photos workflow.
The goal is simple:
✔ Preserve highlight details
✔ Reveal shadow information
✔ Create natural, balanced lighting

When you rely on a single exposure, you have to choose what to sacrifice — highlights or shadows. With exposure bracketing merge, you don’t lose either.
This technique is essential for:
🏠 Real estate interiors
🛋 Living rooms with big windows
🍽 Kitchens with bright lighting
🛁 Bathrooms with mixed light sources
🏢 Commercial and architectural photography
By learning to properly merge bracketed photos, you deliver images that feel closer to how a person sees the space in real life.
Before you can merge bracketed photos, you need to shoot them correctly.
A tripod is critical. Your images must line up perfectly for a clean HDR merge.
Keep your settings consistent:
Only change shutter speed to create different exposures.
For most scenes:
🔹 3 photos: -2, 0, +2
🔹 5 photos: -2, -1, 0, +1, +2
🔹 7+ photos: extreme contrast scenes
The more dynamic range in the room, the more helpful it is to merge bracketed photos with additional exposures.
Once you’ve shot your brackets, import them into your editing software.
Most modern editing tools offer HDR merge bracketed photos features that automatically align and blend exposures.
During this step:
✔ Select all bracketed images of the same scene
✔ Use the “Merge to HDR” or “HDR Merge” option
✔ Turn on auto alignment if available
This ensures your exposure bracketing merge starts with properly aligned images.
Now the blending happens.
When you merge bracketed photos, the software analyzes:
🌤 The brightest parts from dark exposures
🌑 The shadow details from bright exposures
⚖ The balanced tones from mid exposures
The result should be a single HDR image with full detail from highlights to shadows.
The key here is realism. A good HDR merge bracketed photos process produces an image that looks naturally well-lit — not overly dramatic.
After you merge bracketed photos, the HDR image may look slightly flat. That’s normal.
Now refine it:
✨ Increase contrast slightly
✨ Adjust highlights and shadows
✨ Add a bit of clarity or texture
✨ Fine-tune brightness
The goal is to enhance depth while keeping the lighting believable.
Mixed lighting (window light + interior bulbs) can cause color shifts during an exposure bracketing merge.
Fix this by:
🧊 Adjusting white balance
🎯 Correcting color casts
🌈 Ensuring walls look neutral
🪟 Making window light feel natural
Color accuracy is essential when you merge bracketed photos for real estate listings.
HDR merge doesn’t fix lens distortion or crooked lines. Straightening is part of the workflow.
Use perspective tools to:
📏 Straighten vertical lines
🏠 Correct leaning walls
🔲 Align door frames and windows
Clean geometry makes your HDR merge bracketed photos look more professional.
Now polish the final image:
🗑 Remove outlet covers or wall marks
🧼 Clean up sensor dust spots
🖼 Remove minor distractions
Small details make a big difference when you consistently merge bracketed photos for clients.
Cause: Over-aggressive HDR settings
Fix: Reduce highlight compression and edge enhancement
Cause: Curtains, trees, or people moved
Fix: Use de-ghosting options or blend manually
Cause: Too much shadow lifting
Fix: Add contrast and restore blacks
Cause: Mixed light sources
Fix: Adjust white balance and tint
Understanding these issues improves your HDR merge bracketed photos workflow over time.
Why not just shoot one exposure?
Because one shot cannot capture both bright windows and dark interiors at the same time. When you merge bracketed photos, you capture a wider range of light, which creates:
✔ Brighter interiors
✔ Clear outdoor views
✔ More realistic lighting
✔ Better listing performance
That’s why exposure bracketing merge is standard practice in real estate photography.
Once you get comfortable merging bracketed photos, speed becomes important.
Here’s how to work faster:
📂 Batch process similar images
🎛 Use editing presets
💻 Use fast HDR processing software
🗂 Organize files immediately after import
A consistent HDR merge bracketed photos workflow means faster turnaround and more bookings.
While powerful, HDR isn’t for every situation.
Avoid exposure bracketing merge when:
🌆 Shooting twilight exteriors
🎭 Creating dramatic artistic lighting
🚶 Subjects are moving constantly
HDR works best in stable, high-contrast interior scenes.
When you properly merge bracketed photos, clients get:
✨ Bright, welcoming rooms
🪟 Clear window views
🎨 Accurate colors
📸 Professional-looking listings
That translates to:
📈 More listing clicks
📞 More buyer inquiries
🏠 Faster home sales
Learning how to merge bracketed photos is one of the most important skills in modern real estate and interior photography.
By mastering HDR merge bracketed photos techniques and building a reliable exposure bracketing merge workflow, you can consistently produce images that look natural, bright, and professional.
Here’s the formula:
📷 Capture clean bracketed exposures
🖥 Use HDR software to merge bracketed photos
🎚 Refine tone and contrast
🎨 Correct color and lighting
🏢 Fix perspective
🧹 Polish the final image
Do this consistently, and your photos will stand out in every listing gallery.
Bright, balanced HDR images don’t just look good — they help properties sell faster. And that makes you more valuable as a photographer. 🚀📸

Compact, ready to go anywhere
Interchangeable lens that’s upgradeable
Dual 1-inch sensors for improved clarity and low light performance
Dynamic range and 6K 360° capture
360° photo resolution at 21MP

8K 360° video recording for ultra-detailed visuals.
4K single-lens mode for traditional wide-angle shots.
Invisible selfie stick effect for drone-like perspectives.
2.5-inch touchscreen with Gorilla Glass protection.
Waterproof up to 33ft for underwater shooting.

360° photo resolution in 23MP
Slim design at 24 mm thick
Built-in image stabilization for smooth video capture.
Internal 19GB storage for photo and video storage.
Wireless connectivity for remote control and sharing.

60MP 360° still images for high-resolution photography.
5.7K 360° video recording at 30fps.
2.25-inch touchscreen for intuitive control.
USB Type-C port for fast charging and data transfer.
MicroSD card slot for expandable storage.
.png)
.png)

Try it free. No credit card required. Instant set-up.