Remove Background vs Add Background: Which Works Better for Dealerships?

Cloudpano
January 18, 2026
5 min read
Share this post

Remove Background vs Add Background: Which Works Better for Dealerships? 🚗✨

Dealerships today compete in a digital showroom long before a customer ever steps foot on the lot. When buyers search online, they’re judging your inventory instantly—often within seconds. That means your car photos aren’t just “nice to have”… they’re one of the biggest conversion factors in your marketing stack.

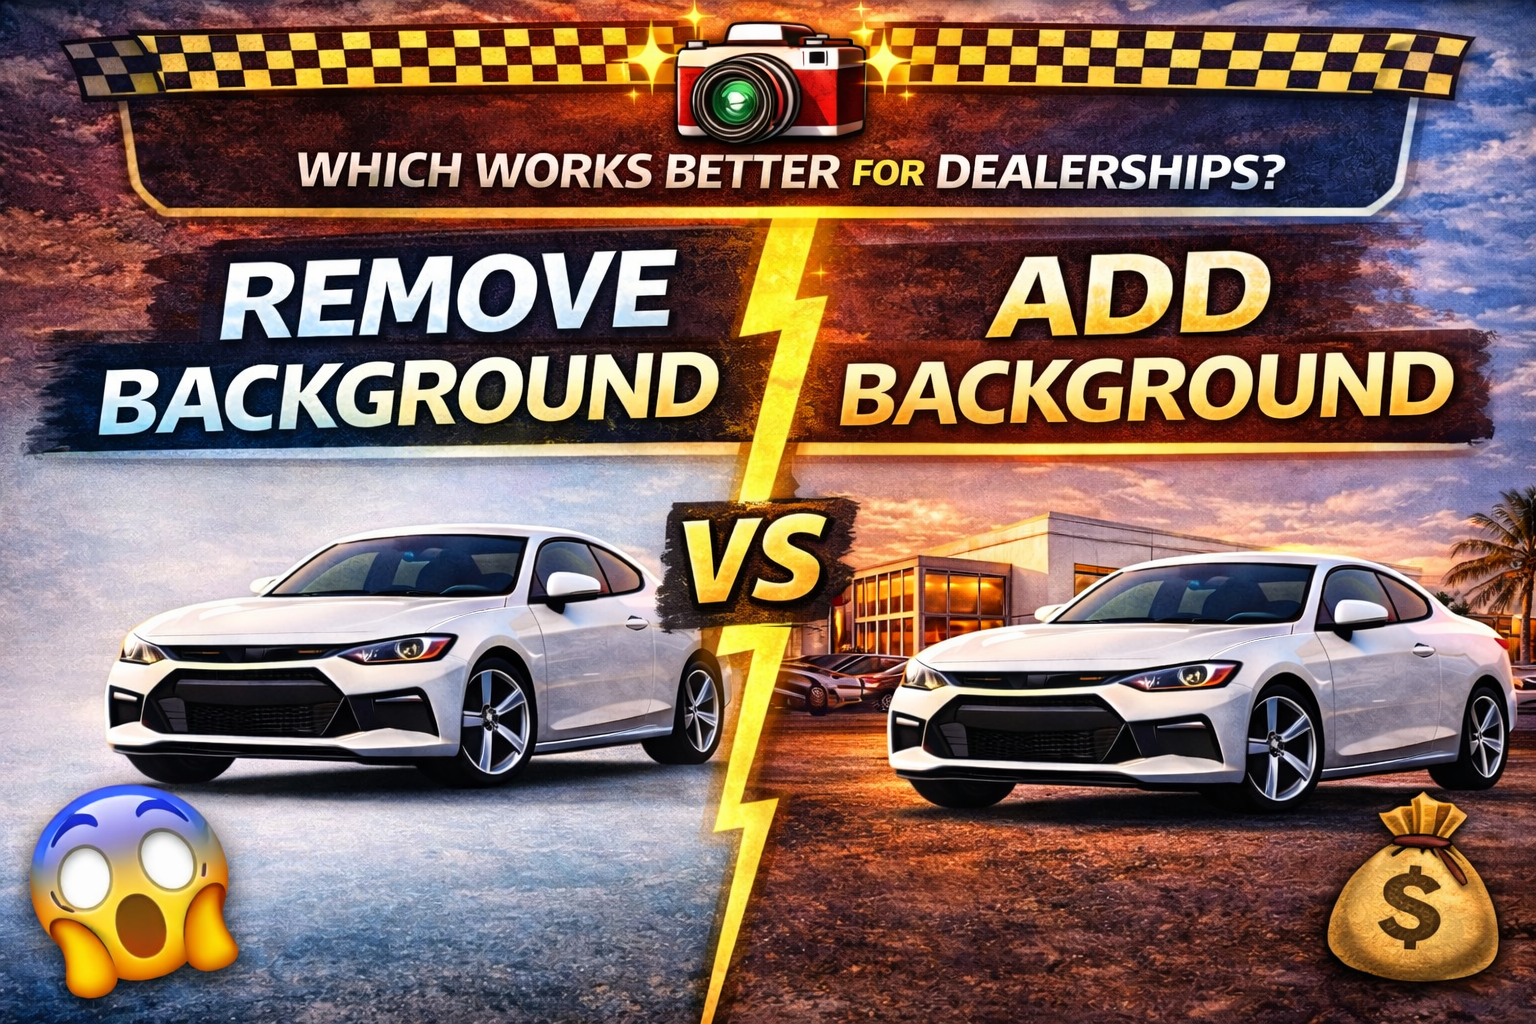
And that brings us to one of the most important debates in modern automotive photo editing:

remove background vs add background — which one works better for dealerships?

The truth is: both strategies can be effective, but they serve different goals. Choosing the right workflow can dramatically improve your online listings, reduce photo editing costs, increase consistency, and even boost trust with buyers.

In this guide, we’ll break down the pros, cons, best use cases, and real-world dealership scenarios for both methods—so you can confidently decide which approach will deliver the most impact.

Let’s dig in. 🚀

Why Car Photo Backgrounds Matter More Than Ever 📸

Online buyers don’t only compare vehicle prices… they compare vehicle presentation.

And background quality directly influences perception.

A clean background communicates:

  • Professionalism ✅
  • Trustworthiness ✅
  • Attention to detail ✅
  • Higher inventory quality ✅

On the flip side, cluttered or inconsistent backgrounds can make even great cars feel less valuable.

Common background problems include:

  • Cars packed tightly in a crowded lot
  • Trash cans, cones, poles, signs, shadows
  • Uneven lighting
  • Busy dealership scenes
  • Weather variability (rain, glare, overcast skies)

This is why more dealerships are adopting background editing workflows.

What Does “Remove Background” Mean? 🧼

Removing the background means taking the vehicle and isolating it from the original environment.

The result is often:

  • Transparent background (cutout)
  • Pure white background
  • Solid color background
  • Simple studio-style backdrop

This method is commonly used to create:

  • Ultra-clean listing images
  • Catalog-style inventory photos
  • Consistent presentation across all vehicles

It works great for dealerships that want their photos to feel polished, uniform, and distraction-free.

What Does “Add Background” Mean? 🌄

Adding a background means replacing the original environment with a new, staged scene.

This can include:

  • Dealership showroom background
  • Skyline background
  • Desert road scene
  • Luxury studio environment
  • Branded “template” scene across inventory

This method is more about creating an emotional vibe around the vehicle—while still maintaining consistency.

It’s especially popular when dealerships want:

  • More “premium” visuals
  • Lifestyle marketing
  • Strong branding
  • Stand-out marketplace images

Remove Background vs Add Background: The Core Difference ⚡

Here’s the simple breakdown:

Remove background = clean + minimal + distraction-free
Add background = branded + stylized + visually memorable

But which is better for dealerships?

Let’s compare both options in a real dealership marketing context.

Option 1: Remove Background (Pros & Cons) ✅

Pros of Removing Background

Removing backgrounds is a powerful strategy because it creates consistency and trust fast.

Key benefits:

  • Looks clean and professional
  • Improves listing clarity
  • Eliminates distractions
  • Boosts consistency across inventory
  • Works with all vehicle types
  • Makes the car the hero
  • Easier to standardize across photographers and locations

This is ideal for dealerships that sell volume and want every car listed quickly in a consistent format.

⚠️ Cons of Removing Background

There are a few potential drawbacks:

  • Can look too “catalog” or “sterile” if overdone
  • If shadows/reflections aren’t realistic, it can look fake
  • White backgrounds can feel generic if every competitor is doing the same thing
  • Some marketplaces favor natural scenes (depending on region)

👉 The key is doing it well. A clean cutout with realistic shadow makes all the difference.

Option 2: Add Background (Pros & Cons) 🌆

✅ Pros of Adding Background

Adding backgrounds can dramatically increase visual impact, especially for certain vehicle categories like luxury, sports, or specialty inventory.

Key benefits:

  • Makes inventory stand out immediately
  • Creates a premium brand vibe
  • Can match your dealership branding
  • Helps create an emotional “lifestyle” feel
  • Great for ads, landing pages, and social media creatives

For example, a truck looks more powerful in a rugged outdoor setting. A luxury sedan looks better with a city skyline. A sports car pops in a studio or high-end backdrop.

⚠️ Cons of Adding Background

However, adding backgrounds can backfire if not done correctly.

Risks include:

  • Vehicles can look “floating” if shadows are off
  • Lighting mismatch makes edits obvious
  • Overly dramatic backgrounds feel fake
  • Customers may distrust photos that look “too edited”
  • Adds complexity if multiple templates are used inconsistently

Dealership customers want photos to be clean and accurate. If edits feel like deception, conversion suffers.

Which Is Better for Dealerships? (Short Answer) 🎯

If your goal is inventory consistency and speed, removing backgrounds usually wins.

If your goal is brand presentation and attention grabbing, adding backgrounds can win—but only when done cleanly and consistently.

The real answer is:

👉 Use both strategically depending on where the photos will be used.

This is the best modern dealership workflow.

Best Use Cases: Remove Background vs Add Background 🧠

Let’s break down when each method works best.

✅ Remove Background Works Best For:

  • Vehicle listing pages (VDPs)
  • Search results pages (SRPs)
  • Marketplace sites
  • High-volume inventory uploads
  • Used car lots with inconsistent conditions
  • Dealers with multiple lot locations

This method is best when you care most about:

  • Clarity
  • Trust
  • Consistency
  • Speed

🌆 Add Background Works Best For:

  • Paid ads (Facebook, Instagram, Google Display)
  • Homepage hero inventory sections
  • Promotional banners
  • Premium or luxury inventory pages
  • Social media marketing
  • Brand awareness campaigns

This is best when you care most about:

  • Standing out visually
  • A premium look
  • Emotional marketing
  • Branding

Why Dealers Are Switching to AI for Both 🤖✨

In the past, dealerships had to pick one because editing was expensive.

But now, AI editing tools can:

  • Remove the background instantly
  • Add backgrounds with consistent templates
  • Auto-create realistic shadows
  • Improve lighting and clarity
  • Standardize results across every car photo

This means dealerships can create a hybrid workflow without increasing labor costs.

What Buyers Trust More (And Why It Matters) 👀

Trust is one of the most important conversion elements in vehicle listings.

Buyers distrust:

  • Unrealistic edits
  • Fake lighting
  • Overdone effects
  • Cars that look “cut out”
  • Backgrounds that don’t match the vehicle

So in the remove background vs add background debate, trust usually leans toward:

Remove background — because it feels cleaner and more honest.

But…

If your added background is subtle, realistic, and consistent, it can still look trustworthy—and elevate the entire dealership presentation.

How to Avoid Fake-Looking Edits (No Matter Which You Choose) 🛑

Whether you remove or add backgrounds, these mistakes kill realism:

🚫 1. Floating car effect

This happens when shadows don’t ground the tires naturally.

🚫 2. Harsh outlines

When the cutout edge looks too crisp or glowy.

🚫 3. Lighting mismatch

If the original lighting was warm and the new background is cold, it screams “edited.”

🚫 4. Wrong perspective

A background horizon line that doesn’t match the camera angle looks off instantly.

🚫 5. Oversaturated scenery

Too much color looks cartoonish.

✅ The best edits are subtle. When customers don’t notice the edit, you win.

The Ideal Dealership Strategy (Recommended) ✅

If you’re running a modern dealership marketing workflow, here’s what works best:

✅ Use Remove Background for your inventory photos

Standardize:

  • VDPs
  • SRPs
  • Third-party marketplaces

This ensures:

  • fast uploads
  • clean catalog presentation
  • fewer distractions
  • consistent inventory visuals

🌆 Use Add Background for marketing assets

Use branded backgrounds for:

  • paid ads
  • promotional sections
  • featured inventory
  • luxury campaigns

This ensures:

  • higher engagement
  • stronger brand identity
  • better creative performance

Final Verdict: Remove Background vs Add Background 🚗⚡

So, which works better for dealerships?

Remove background is best for consistent inventory and trust
Add background is best for branding and attention (when done right)

The smartest dealerships don’t choose one…

They build a system where both exist in the workflow strategically.

🚀 Your All-In-One Virtual Experience Stack Starts Here

Share this post
Cloudpano

Choose The Right 360° Camera

Insta360 ONE RS 1-Inch 360 Edition

  • Compact, ready to go anywhere

  • Interchangeable lens that’s upgradeable

  • Dual 1-inch sensors for improved clarity and low light performance

  • Dynamic range and 6K 360° capture

  • 360° photo resolution at 21MP

Learn More

Insta360 X4

  • 8K 360° video recording for ultra-detailed visuals.

  • 4K single-lens mode for traditional wide-angle shots.

  • Invisible selfie stick effect for drone-like perspectives.

  • 2.5-inch touchscreen with Gorilla Glass protection.

  • Waterproof up to 33ft for underwater shooting.

Learn More

Ricoh Theta Z1

  • 360° photo resolution in 23MP

  • Slim design at 24 mm thick

  • Built-in image stabilization for smooth video capture.

  • Internal 19GB storage for photo and video storage.

  • Wireless connectivity for remote control and sharing.

Learn More

Ricoh Theta X

  • 60MP 360° still images for high-resolution photography.

  • 5.7K 360° video recording at 30fps.

  • 2.25-inch touchscreen for intuitive control.

  • USB Type-C port for fast charging and data transfer.

  • MicroSD card slot for expandable storage.

Learn More
Property Marketing
Allows potential buyers to explore properties in detail from anywhere, enhancing the real estate marketing process.
Automotive Spins
Create an interactive virtual showroom and engage affluent digital buyers with live 360º video calls, all through the CloudPano mobile app for a complete automotive sales solution.
Interactive Floor Plans
Create 2D and 3D floor plans with measurements in 4 minutes or less, all from your phone. Download the Floor Plan Scanner app and get your first scan free.

360 Virtual Tours With CloudPano.com. Get Started Today.

Try it free. No credit card required. Instant set-up.

Try it free
Latest posts

See our other posts

Interviews, tips, guides, industry best practices, and news.

Property Manager Video Hub: Scaling Rental Visibility with AI Photo-to-Video Workflows

This article explains how property managers can use PhotoAIVideo to build a property manager video hub: a repeatable system for turning rental photos, amenity images, floor plans, exterior shots, and neighborhood visuals into reusable rental marketing videos. The main idea is that property managers do not just need more listing exposure. They need clearer visual answers that help renters decide whether to schedule a tour. PhotoAIVideo is positioned as a practical tool for creating: Unit availability videos Amenity highlight videos Neighborhood videos Tour reminder clips Leasing follow-up videos Owner marketing proof videos Social media rental teasers Application or availability reminder videos Key takeaways: Property managers already have the media they need; the challenge is organizing it and turning it into reusable video assets. A video hub helps teams create consistent videos across units, floor plans, amenities, communities, and owner updates. Rental videos can reduce friction by answering renter questions about layout, condition, amenities, parking, pet features, and community feel. One rental photo set can become multiple video outputs for listings, social media, email, text follow-up, tour reminders, and owner reporting. Photographers can sell AI rental video packages to property managers as an upsell. Brokerages with property management divisions can use the same workflow to standardize leasing content. The article ends with a step-by-step process, video hub framework, mistakes to avoid, visual recommendations, FAQs, and a CTA encouraging readers to use PhotoAIVideo to turn rental photos into a scalable video system for rental visibility.
Read post

YouTube Shorts Listing Teasers: The 3-Scene Structure for Higher Property Clicks

This article explains how real estate agents, photographers, brokerages, and property managers can use YouTube Shorts listing teasers to drive more property clicks and showing requests. The main idea is that a YouTube Short should not try to show the entire house. Instead, it should use a simple 3-scene structure: Scene 1: Hook — stop the scroll with the strongest property feature. Scene 2: Proof — show the visuals that support the hook. Scene 3: Click Path — tell the viewer what to do next. The article positions PhotoAIVideo as a practical tool for turning listing photos into short vertical videos for YouTube Shorts, Reels, open house promotion, and listing campaigns. Key takeaways: YouTube Shorts should create curiosity, not replace the full listing video. The strongest property feature should appear first, not necessarily the front exterior. Agents should build each Short around one click reason, such as backyard, kitchen, layout, neighborhood, open house, or price point. One listing can become multiple Shorts instead of one generic video. Photographers can offer YouTube Shorts teaser packs as a video upsell. Brokerages can standardize the 3-scene structure across agents. Property managers can use the same structure to promote rentals and tours. The article ends with practical scripts, visual recommendations, FAQs, a visual placement guide, and a CTA encouraging readers to use PhotoAIVideo to create YouTube Shorts listing teasers from property photos.
Read post

Video Retargeting for Listings: Turning Photo-Based AI Videos into Appointment Follow-Up

This article explains how Realtors, photographers, brokerages, and property managers can use photo-based AI videos as follow-up assets after someone shows interest in a listing. The main idea is that most real estate marketing focuses on getting the first click, but many buyers and sellers need multiple touchpoints before booking a showing or appointment. Video retargeting helps agents re-engage people who already clicked a listing, watched a Reel, opened an email, attended an open house, asked about a property, or went quiet after showing interest. PhotoAIVideo is positioned as a practical tool for turning listing photos into short follow-up videos, including: Feature reminder videos Layout explainer videos Neighborhood fit videos Open house recap videos Price update videos Seller proof videos Showing request videos Rental tour recovery videos Key takeaways: A first-touch listing video introduces the property, while a retargeting video answers the next likely question. Follow-up videos should be short, usually 10–30 seconds, and focused on one action. Agents should send different videos based on behavior, such as email clicks, open house attendance, listing views, or showing interest. A good video follow-up feels helpful, not pushy. Photographers can package retargeting video clips as an upsell. Brokerages can standardize video retargeting workflows across agents. Property managers can use the same strategy to recover rental leads and book tours. The article ends with a simple retargeting sequence, visual recommendations, FAQs, and a CTA encouraging readers to use PhotoAIVideo to turn listing photos into appointment-driving follow-up videos.
Read post