Step-by-Step Guide: Using CloudPano’s 360 Measuring Tool for Accurate Takeoffs

Cloudpano
November 9, 2025
5 min read
Share this post

Step-by-Step Guide: Using CloudPano’s 360° Measuring Tool for Accurate Takeoffs 📏🏠

In today’s fast-moving property, construction, and insurance industries, accurate takeoffs are everything. Whether you're estimating materials, documenting damage, planning a renovation, or preparing a claim, precision saves time, money, and costly errors.

Traditionally, this meant measuring every room in person — sometimes multiple times. But with modern 360° technology, the game has completely changed. Learn how to measure floors, walls, and spaces with precision using CloudPano’s powerful 360 measuring software — perfect for real estate, construction, and design pros.

CloudPano’s 360° Measuring Tool allows you to capture a space once and measure it forever. Instead of returning to a site, you can calculate wall areas, floor plans, openings, and takeoff quantities directly inside a virtual tour.

This guide walks you step-by-step through using CloudPano’s 360 Measuring Tool for fast, accurate, and reliable takeoffs from anywhere. Let’s dive in. 🚀

Why 360° Takeoffs Are Better Than Traditional Methods

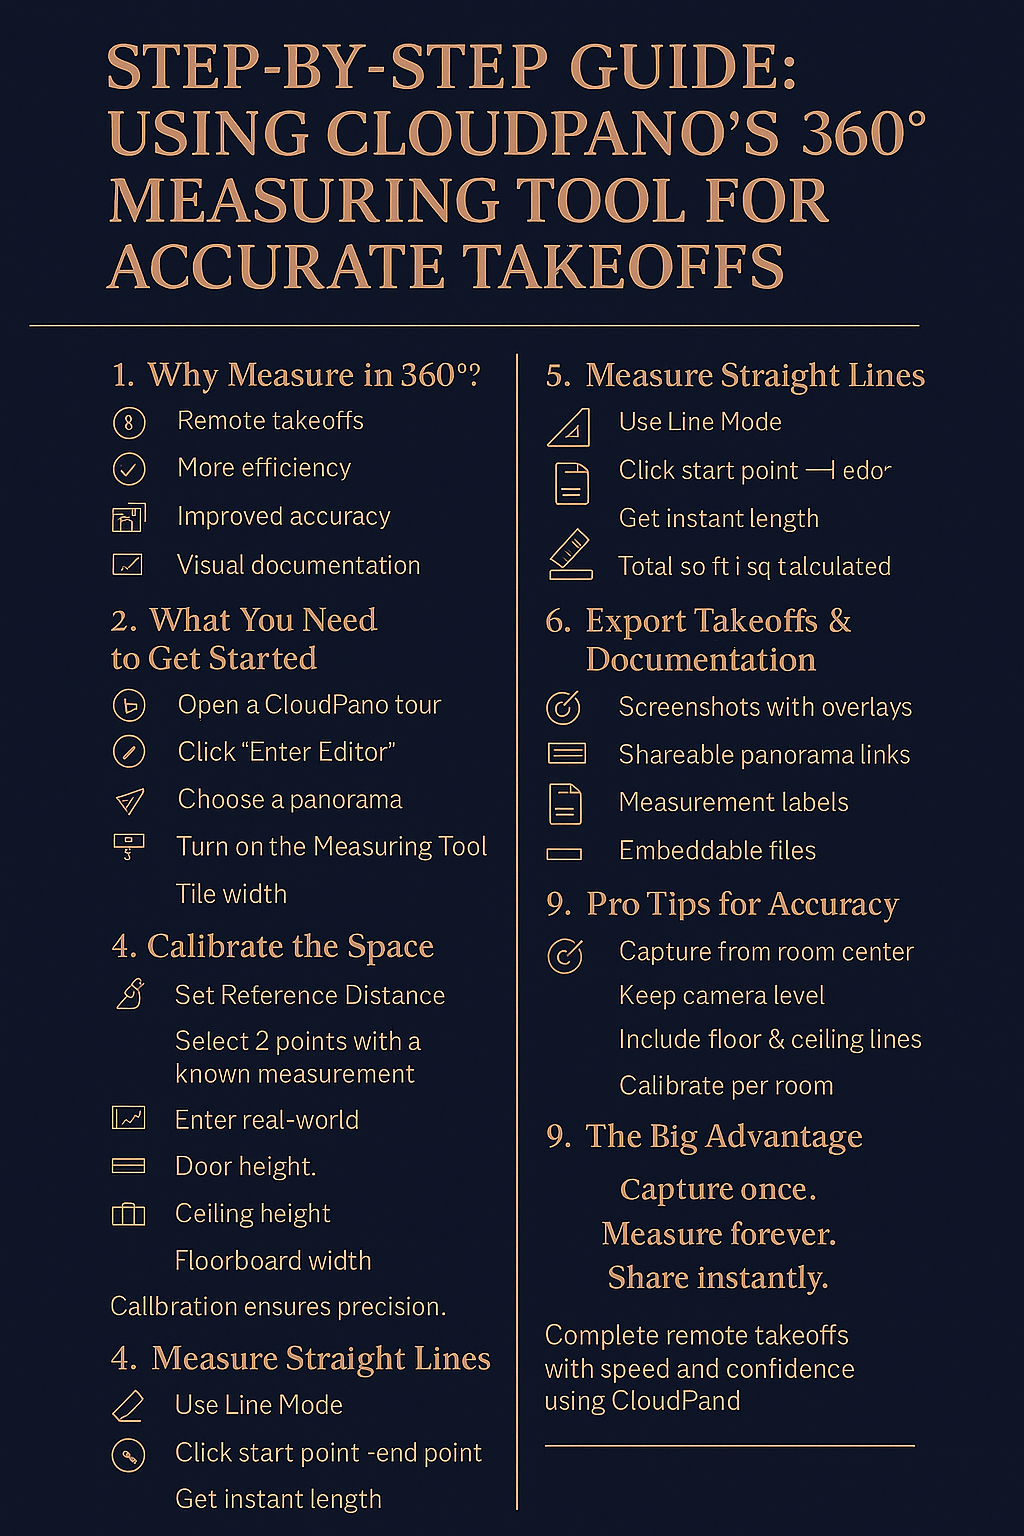
Before jumping into the steps, here’s why more professionals are switching to 360° measurement workflows.

📌 Remote Measuring Saves Time

Once a room is captured, you never need to physically remeasure it. Everything is available inside the virtual tour.

📌 Faster, More Efficient Takeoffs

Contractors, adjusters, property managers, and restoration pros can generate quantities in minutes — not hours.

📌 Accuracy That Improves Workflows

With proper calibration, CloudPano measurements provide practical accuracy for:

  • Floor areas
  • Wall surface areas
  • Ceiling spans
  • Room dimensions
  • Cabinet and countertop lengths
  • Material quantities

📌 Visual Proof for Every Measurement

Every takeoff is tied to a visual spot in the room — perfect for insurance claims, disputes, job files, and client communication.

📌 Works Across Multiple Industries

CloudPano’s 360 Measuring Tool is widely used in:

  • Insurance adjusting 📝
  • Water/mold/fire restoration 🧱
  • Construction estimating 👷
  • Roofing documentation 🏚️
  • Property management 🏢
  • Real estate marketing 🏡
  • Interior design 🎨

If a space needs to be measured, 360° is the smarter way to do it.

🎥 What You Need Before Starting

To get accurate measurements in CloudPano, you’ll need:

A 360° panorama (Ricoh Theta, Insta360, GoPro Max, or drone 360)
A CloudPano Pro or higher account
A clear line between floors, walls, and ceilings
One known reference measurement (door height, tile width, counter height, etc.)

Once these pieces are in place, you're ready to begin your takeoff.

📏 Step-by-Step Guide: Using CloudPano’s 360 Measuring Tool

Let’s go step-by-step through the entire process — from opening your tour to exporting finished measurements.

STEP 1: Open the Tour & Activate the Measuring Tool 🧰

Start inside your CloudPano dashboard.

  1. Log into your CloudPano account
  2. Open the virtual tour containing the space you want to measure
  3. Click “Enter Editor”
  4. Select your panorama
  5. Activate the Measuring Tool

Once activated, CloudPano will display the measurement interface on your screen.

This interface contains tools for:

  • Line measurements
  • Area measurements
  • Vertical surface measurements
  • Calibration

Your takeoff process begins here.

STEP 2: Calibrate the Space for Accuracy 🎯

Calibration is the most important part of accurate 360° measurements. You must give CloudPano one known real-world distance from inside the panorama.

Common calibration reference points:

  • Door height (typically 6'8" / 203 cm)
  • Ceiling height
  • Countertop height (36" / 91 cm)
  • Tile width
  • Floorboard width
  • A measured wall segment

How to calibrate accurately:

  1. Click “Set Reference Distance”
  2. Click two points forming a straight vertical or horizontal line
  3. Enter the exact real-world length
  4. Confirm the calibration

CloudPano will now scale the entire room.
After this step, all your measurements will be accurate.

STEP 3: Measure Straight-Line Distances 📐

Straight-line measurements are essential for most takeoffs.

Use this to measure:

  • Wall lengths
  • Door widths
  • Room spans
  • Ceiling distances
  • Cabinet sections
  • Openings & transitions
  • Countertop runs

How to measure:

  1. Click the Line Measure tool
  2. Click your starting point
  3. Click your ending point
  4. Immediately see results in ft/m

Straight-line measurements instantly display on the 360° image, showing both the number and the visual line overlay.

STEP 4: Measure Floor Areas (Square Footage) 🏠📏

Floor area measurements are critical for:

  • Flooring estimates
  • Water damage scoping
  • Remodel planning
  • Real estate floor plans
  • Unit turnovers

How to measure floor areas:

  1. Select Area Mode
  2. Trace the perimeter of the floor
  3. Close the shape
  4. CloudPano calculates:
    • Total square footage
    • Total square meters
    • Polygon outline

Pro Tip:
Place points exactly where walls meet the floor. This gives the cleanest and most accurate results.

STEP 5: Measure Wall Surface Areas (Vertical Takeoffs) 🧱🎨

Vertical takeoffs are essential for:

  • Painting
  • Drywall
  • Fire & water restoration
  • Mold remediation
  • Paneling
  • Demo estimates
  • Board-up services

How to measure wall surfaces:

  1. Select Vertical Mode
  2. Click the bottom-left of the wall
  3. Click the top-left
  4. Click the top-right
  5. Click the bottom-right
  6. Close your shape

CloudPano automatically computes:

  • Wall height
  • Wall width
  • Total wall area

This gives you precise estimates for square footage quantities, saving hours of manual measuring.

STEP 6: Export Takeoffs & Measurement Documentation 📤

After measuring all required components, export your results for sharing or reporting.

CloudPano provides:

  • Screenshots with measurement overlays
  • Shareable links to the exact panorama
  • Measurement labels for clarity
  • Embeddable links for client portals
  • Files appropriate for insurance carriers or construction bidding

This eliminates confusion and creates visual proof for every takeoff.

🧠 Best Practices for Maximum Accuracy

To get the most out of CloudPano’s Measuring Tool, use these pro tips:

✅ 1. Capture From the Center of Each Room

This ensures the best geometric perspective.

✅ 2. Keep the Camera Level

A level camera reduces distortion and increases measurement precision.

✅ 3. Include Both Floor & Ceiling Edges

Clear geometry = accurate takeoffs.

✅ 4. Calibrate in Every New Room

Different rooms may have slightly different perspective characteristics.

✅ 5. Measure the Same Object Twice

A quick validation step keeps reports accurate and professional.

🧱 Who Uses CloudPano for Takeoffs? (Real-World Applications)

CloudPano’s measuring system is used across dozens of industries.

📌 Insurance Adjusters

Measure damage areas, document claims, and provide verifiable data.

📌 Restoration Companies

Quantify wall and floor areas for water, fire, and mold jobs.

📌 Contractors & Builders

Create fast takeoffs without visiting the jobsite multiple times.

📌 Property Managers

Measure units during turnovers and renovations.

📌 HVAC & Mechanical Trades

Check clearances, room sizes, and installation spacing.

📌 Real Estate Agents

Add dimensions and square footage to listings.

📌 Architects & Designers

Use measurements for early planning and 3D modeling.

360° measuring simplifies every workflow — and speeds up decision-making.

Read:

Conclusion: CloudPano Makes Accurate Takeoffs Faster, Easier & More Professional

CloudPano’s 360 Measuring Tool transforms how professionals capture and calculate room dimensions. Instead of walking around with a tape, revisiting properties, or manually documenting every detail, you can now:

✅ Capture once
✅ Measure forever
✅ Share instantly
✅ Produce accurate, visual takeoffs

Whether you're handling an insurance claim, bidding on a construction project, planning a remodel, or documenting a unit for turnover, CloudPano gives you an unbeatable advantage.

360° takeoffs are the future — and CloudPano makes them simple. 🚀

Your all-in-one virtual experience solution starts here.

Share this post
Cloudpano

Choose The Right 360° Camera

Insta360 ONE RS 1-Inch 360 Edition

  • Compact, ready to go anywhere

  • Interchangeable lens that’s upgradeable

  • Dual 1-inch sensors for improved clarity and low light performance

  • Dynamic range and 6K 360° capture

  • 360° photo resolution at 21MP

Learn More

Insta360 X4

  • 8K 360° video recording for ultra-detailed visuals.

  • 4K single-lens mode for traditional wide-angle shots.

  • Invisible selfie stick effect for drone-like perspectives.

  • 2.5-inch touchscreen with Gorilla Glass protection.

  • Waterproof up to 33ft for underwater shooting.

Learn More

Ricoh Theta Z1

  • 360° photo resolution in 23MP

  • Slim design at 24 mm thick

  • Built-in image stabilization for smooth video capture.

  • Internal 19GB storage for photo and video storage.

  • Wireless connectivity for remote control and sharing.

Learn More

Ricoh Theta X

  • 60MP 360° still images for high-resolution photography.

  • 5.7K 360° video recording at 30fps.

  • 2.25-inch touchscreen for intuitive control.

  • USB Type-C port for fast charging and data transfer.

  • MicroSD card slot for expandable storage.

Learn More
Property Marketing
Allows potential buyers to explore properties in detail from anywhere, enhancing the real estate marketing process.
Automotive Spins
Create an interactive virtual showroom and engage affluent digital buyers with live 360º video calls, all through the CloudPano mobile app for a complete automotive sales solution.
Interactive Floor Plans
Create 2D and 3D floor plans with measurements in 4 minutes or less, all from your phone. Download the Floor Plan Scanner app and get your first scan free.

360 Virtual Tours With CloudPano.com. Get Started Today.

Try it free. No credit card required. Instant set-up.

Try it free
Latest posts

See our other posts

Interviews, tips, guides, industry best practices, and news.

How Photographers Can Sell AI Listing Videos to Their Agent Clients

AI technology is transforming real estate media — and photographers who adapt early have a major competitive advantage. This in-depth guide explains how to sell AI listing videos to agent clients by positioning them as a premium marketing upgrade rather than a technical novelty. The article walks through practical sales strategies, pricing models, subscription opportunities, and common objections, while showing how AI-powered talking head videos can increase average order value and create recurring revenue. Readers will learn how to package AI listing videos into photo bundles, monthly content plans, and brokerage-wide solutions that elevate their services from simple media delivery to full marketing automation. If you’re a photographer looking to future-proof your business and increase profitability, this guide provides a clear roadmap to selling AI listing videos effectively.
Read post

How to Build a Recurring Revenue Stream Using AI Avatar Videos

AI avatar videos are transforming how real estate media professionals build stable, scalable businesses. In this comprehensive guide, we break down how to turn one-off video projects into a predictable recurring revenue real estate media model using AI-powered talking head technology. Instead of selling per-listing shoots, you’ll learn how to package automated listing videos, market updates, and branded content into monthly subscription offers that increase client retention and lifetime value. The article explores practical use cases, pricing strategies, workflow automation, competitive advantages, and common objections — all designed to help photographers, videographers, and marketing agencies shift from transactional income to recurring revenue. If you’re ready to move from freelancer to scalable media platform, this guide outlines a clear roadmap for building consistent monthly income in real estate marketing.
Read post

How to Create an AI Avatar Listing Video From One Headshot (Step-by-Step)

Learn how to create an AI avatar listing video from a single professional headshot using simple, step-by-step software tools. This guide walks real estate agents, brokers, and photographers through the exact process of turning one static image into a talking AI avatar that delivers listing presentations automatically. Discover how AI avatar listing videos save time, boost engagement, improve consistency across marketing channels, and help agents scale their video content without recording new footage. Perfect for anyone looking to modernize their real estate marketing with AI-powered automation.
Read post