


.png)

Want your virtual tour to appear directly on Google Maps or Google Street View — where millions of people search every day? 🌎
Good news: with CloudPano, it’s easier than ever to publish your 360° virtual tours directly to Google Street View and boost your visibility online. 🌐 Learn how to land clients fast with Google Street View virtual tours — watch the free training now!
Whether you’re a university showcasing campus grounds, a real estate photographer, or a business owner showing off your facility, being on Street View means global exposure and better search rankings. 🏆
In this step-by-step guide, you’ll learn exactly how to upload, link, and publish your virtual tour on Google Street View — using CloudPano’s simple workflow. A real estate video app makes it easy for agents to turn listing photos into high-quality videos that boost MLS visibility. With virtual staging for real estate, agents can showcase empty spaces as fully furnished, ready-to-move homes.
Google Street View isn’t just for major landmarks — it’s for any business or institution that wants to be discovered.
Here’s why publishing your tour there is a game changer:
💬 If a picture is worth a thousand words, a 360° virtual tour is worth a thousand clicks.
Before uploading to Google Street View, make sure you have:
✅ A CloudPano Pro account (with Street View publishing enabled)
✅ 360° photos or a completed CloudPano virtual tour
✅ A verified Google Business Profile (GBP)
✅ Location permission for your photos (GPS metadata)
✅ Access to your Google account linked to the business or place
Once you’ve got these ready, you’re set to go live on Street View! 🌍
Read: Step-by-Step Google Maps and Street View Marketing for Realtors
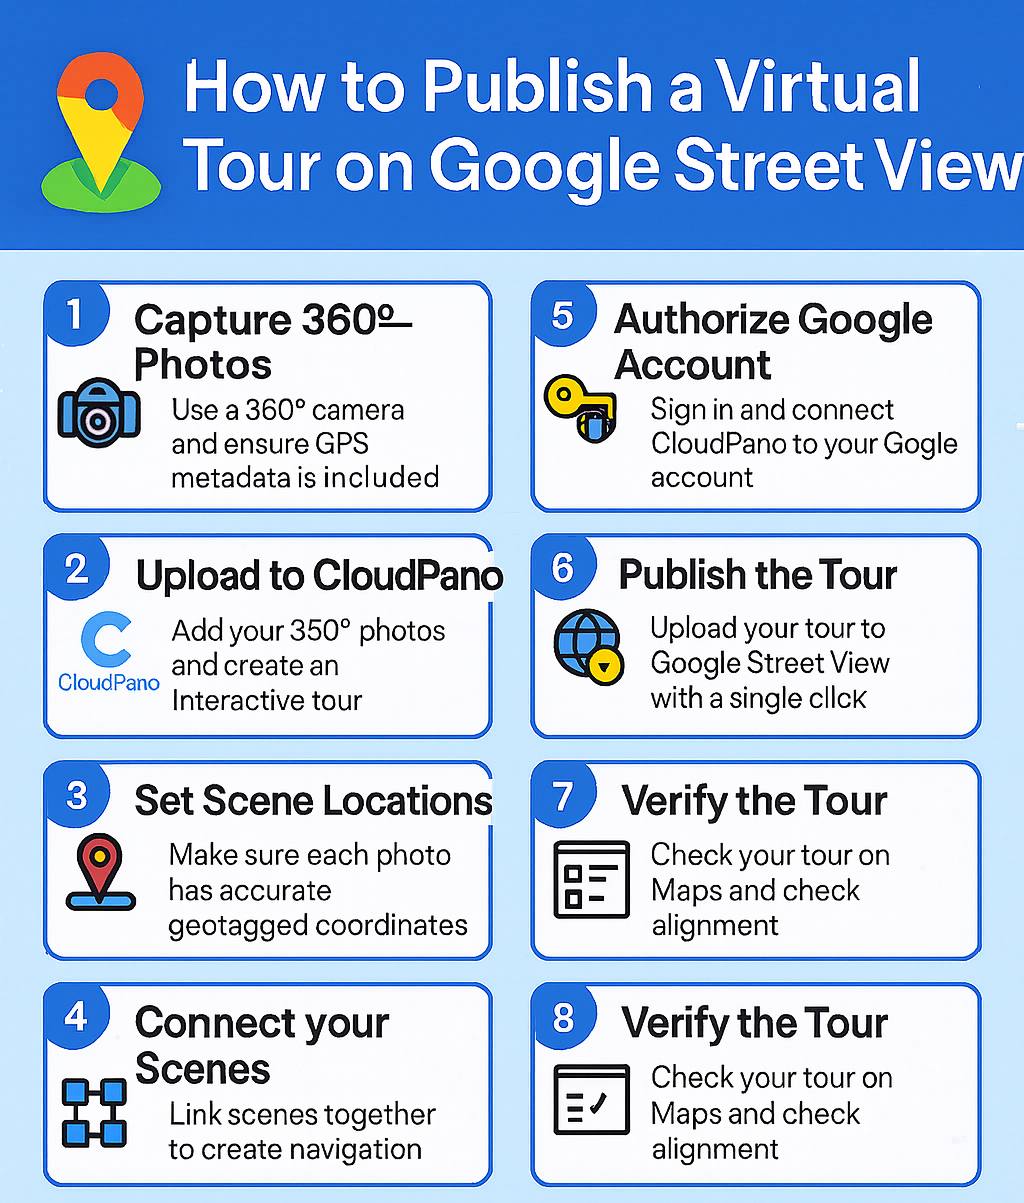
The foundation of a great Street View tour is your 360° imagery.
To get started:
💡 Tip: Shoot at eye level (around 5–6 feet high) to make your Street View experience natural and immersive.
🎥 For large properties (like campuses or resorts), capture multiple connected scenes so viewers can “walk through” locations seamlessly.
Next, head to CloudPano.com and sign in to your account.
CloudPano’s intuitive interface allows you to quickly preview how your tour will look in 360° view before publishing.
💬 This step transforms your static 360° photos into an interactive navigation experience — ready for Google Street View.
For Google Street View to display your tour correctly on the map, each photo must be geotagged with accurate latitude and longitude data.
If your camera includes GPS, CloudPano will auto-detect these coordinates. 🌎
Otherwise, you can:
💡 Example:
Accurate tagging ensures your virtual tour appears exactly where users expect to find it on Google Maps.
Now that your images are uploaded and geotagged, it’s time to connect them together — so users can “walk” through your tour like Street View.
In CloudPano, use the link hotspots feature:
💬 Smooth transitions = higher engagement.
This step replicates the real-world navigation experience Google Street View is known for.
To publish your tour directly, you’ll need to authorize CloudPano to access your Google Street View account.
Here’s how:
Once connected, CloudPano will sync your virtual tour to your verified business address.
💬 Don’t worry — CloudPano uses official Google APIs for security and compliance.
This is the exciting part! 🎉
After your Google account is linked, simply click:
👉 Publish to Street View
CloudPano will then:
Within minutes to a few hours (depending on size), your tour will appear live on Google Maps and Street View — accessible to anyone searching your business or campus. 🗺️
💡 Pro Tip: Check your tour in both desktop and mobile Google Maps to ensure everything displays perfectly.
Once your tour is live, you’ll want to confirm that it’s properly displayed.
✅ Go to your business listing on Google Maps.
✅ Click “See Inside” or drag the Street View icon onto your location.
✅ Walk through your tour to check:
If you spot any misalignment or missing scenes, you can edit them directly in CloudPano and re-publish.
💬 Optimization Tip:
Add your university or business name clearly in one of the scenes to boost brand recognition when people explore your tour.
Once your 360° tour is live, Google’s internal metrics will start tracking engagement.
Here’s what to watch:
You can access these stats in your Google Business Profile dashboard — under “Photo Views” and “Engagement.”
💡 Higher engagement means better local SEO ranking and visibility.
Publishing your virtual tour is just the beginning. To maximize impact, share it across your digital ecosystem:
🎯 When students or customers can “walk through” your space before visiting, they’re far more likely to take action.
Just like your campus or facility evolves, so should your virtual tour.
Revisit your CloudPano project every few months to:
💬 Keeping your tour fresh ensures your Google listing remains relevant and professional.
Here are some expert tips to make your Google Street View tour stand out:
💡 Remember: your virtual tour is both a marketing tool and a first impression.
Read: Google Street View for Profit: Business Models That Work in 2025
While some tools require complex API setup or third-party software, CloudPano integrates directly with Google’s Street View API, making the process simple and fast.
Here’s what sets CloudPano apart:
CloudPano empowers you to not only create but also own your virtual presence on Google Maps — increasing your reach and credibility.
💬 With CloudPano, your virtual tour doesn’t just live online… it lives where your audience is searching.
Publishing a virtual tour on Google Street View has never been easier — and the rewards are massive.
You get:
With CloudPano, you can turn your 360° photos into an interactive Street View experience in just a few clicks — no technical background needed.
So go ahead — showcase your world, invite people in, and let your space shine on the biggest virtual stage there is: Google Street View. 💫

Compact, ready to go anywhere
Interchangeable lens that’s upgradeable
Dual 1-inch sensors for improved clarity and low light performance
Dynamic range and 6K 360° capture
360° photo resolution at 21MP

8K 360° video recording for ultra-detailed visuals.
4K single-lens mode for traditional wide-angle shots.
Invisible selfie stick effect for drone-like perspectives.
2.5-inch touchscreen with Gorilla Glass protection.
Waterproof up to 33ft for underwater shooting.

360° photo resolution in 23MP
Slim design at 24 mm thick
Built-in image stabilization for smooth video capture.
Internal 19GB storage for photo and video storage.
Wireless connectivity for remote control and sharing.

60MP 360° still images for high-resolution photography.
5.7K 360° video recording at 30fps.
2.25-inch touchscreen for intuitive control.
USB Type-C port for fast charging and data transfer.
MicroSD card slot for expandable storage.
.png)
.png)

Try it free. No credit card required. Instant set-up.


